Difference between revisions of "Staff hud"
m |
m |
||
| (6 intermediate revisions by the same user not shown) | |||
| Line 10: | Line 10: | ||
<h4><p style="text-align:left; color: #fe5656;border: 2px solid gray;padding: 10px;"> 1. The HUD interface </p></h4> | <h4><p style="text-align:left; color: #fe5656;border: 2px solid gray;padding: 10px;"> 1. The HUD interface </p></h4> | ||
[[File:Staff hud main.png|center|main]] | [[File:Staff hud main.png|center|main]] | ||
| − | <br | + | <br> |
<p>The PFS Staff HUD is a useful tool that help any staff or pony in its daily activities around PFS. It has been designed to make your life easier. The main HUD gives you several informations regarding your position at PFS</p> | <p>The PFS Staff HUD is a useful tool that help any staff or pony in its daily activities around PFS. It has been designed to make your life easier. The main HUD gives you several informations regarding your position at PFS</p> | ||
| − | <p>The | + | <p>The <span strong style="color: #c75399">first line</span> display your staff position and pony rank, if you have. If you have none you will be displayed as </span> pressed and <span style="color: #c75399">PFS Guest</span> |
| − | <br/> | + | </p> |
| + | <p>The <span style="color: #2ab039">second line</span> display your actual week points as PFS staff</p> | ||
| + | <p>If you are a lucky PFS Pony that owns a stall at PFS barn, the <span style="color: #6cb7d5">ring</span> where you are leashed on store command is displeyd down right</p><br> | ||
| + | <p><u><b>The HUD have differents buttons with the following features:</b></u></p><br> | ||
| + | <p>[[File:staff_hud_www.png|left|www]]Access the integrated web browser to get your personnal informations regarding your activities at PFS as staff and the PFS Cargo System</p><br> | ||
| + | <p>[[File:staff_hud_arrows.png|left|www]]Access the Whip Commands HUD for carting and whip circle</p><br> | ||
| + | <p>[[File:staff_hud_mire.png|left|www]]Access the PFS Collar Shortcuts HUD</p><br> | ||
| + | <p>[[File:PFS logo white 75.png|left|www]]Access this page or use it as Compass to navigate through PFS regions to deliver your goods using the PFS Cargo System</p><br><br> | ||
| + | <p>[[File:Warning64.png|frameless|left]]If you are not a PFS staff, the Collar Shortcuts HUD won't be allowed to get accessed, but the rest of the HUD is still working. So anyone can use it as a free Whip HUD or use it with the PFS Cargo System</p><br><br> | ||
<!--=====================================================--> | <!--=====================================================--> | ||
<!--1.1 cargo system --> | <!--1.1 cargo system --> | ||
| Line 23: | Line 31: | ||
<br/> | <br/> | ||
<!--=====================================================--> | <!--=====================================================--> | ||
| − | <!--1.2 | + | <!--1.2 whip section --> |
| − | |||
| − | |||
| − | |||
| − | |||
| − | |||
| − | |||
| − | |||
| − | |||
<!--=====================================================--> | <!--=====================================================--> | ||
| − | <h5><p style="text-align:left; color: #fe5656;border: 2px solid grey;padding: 10px;"> 1. | + | <h5><p style="text-align:left; color: #fe5656;border: 2px solid grey;padding: 10px;"> 1.2 The whip tab</p></h5> |
| − | [[File: | + | [[File:Staff hud whip2.png|center|whip tab]] |
<br/> | <br/> | ||
| − | <p>This tab will help you to give orders to your pony for the usual ponyplay like carting, whip circle, etc... You can get a menu to adjust the settings to your liking:</p> | + | <p>This tab will help you to give orders to your pony for the usual ponyplay like carting, whip circle, etc...You can get a menu to adjust the settings to your liking using the [[File:neon wheel 100.png]]</p> |
| − | [[File: | + | [[File:Staff hud settings.png|center|whip settings]] |
<br/> | <br/> | ||
<table style="width:100%"> | <table style="width:100%"> | ||
| Line 62: | Line 62: | ||
<tr> | <tr> | ||
<td><font color="#ffdd33">-set gender-</td> | <td><font color="#ffdd33">-set gender-</td> | ||
| − | <td>selects the gender you want to use for the text chat male/neutral/female</td> | + | <td>selects the gender you want to use for the text chat male/neutral/female, it also toggle the sound expression gender</td> |
</tr> | </tr> | ||
<tr> | <tr> | ||
| Line 69: | Line 69: | ||
</tr> | </tr> | ||
<tr> | <tr> | ||
| − | <td><font color="#ffdd33">- | + | <td><font color="#ffdd33">-bee speed-</td> |
<td>disables all the blinking animations to increases the speed, careful on the sound mess!</td> | <td>disables all the blinking animations to increases the speed, careful on the sound mess!</td> | ||
| + | </tr> | ||
| + | <tr> | ||
| + | <td><font color="#ffdd33">-chg size-</td> | ||
| + | <td>toggle the Whip HUD size to 3 sizes: small, medium & big</td> | ||
</tr> | </tr> | ||
</table> | </table> | ||
<br/> | <br/> | ||
<!--=====================================================--> | <!--=====================================================--> | ||
| − | <!--1. | + | <!--1.3 collar section --> |
<!--=====================================================--> | <!--=====================================================--> | ||
| − | <h5><p style="text-align:left; color: #fe5656;border: 2px solid grey;padding: 10px;"> 1. | + | <h5><p style="text-align:left; color: #fe5656;border: 2px solid grey;padding: 10px;"> 1.3 The collar tab</p></h5> |
| − | [[File: | + | [[File:Staff hud collar.png|center|collar tab]] |
| + | <br/> | ||
| + | <p>This tab will help you to use the PFS collar features by using buttons instead of the command line. The available commands are:</p> | ||
<br/> | <br/> | ||
<table style="width:100%"> | <table style="width:100%"> | ||
<tr> | <tr> | ||
| − | <th style="width: 20%"> | + | <th style="width: 20%"><font color="#FF0000">function</th> |
| − | <th style="width: 80%">description</th> | + | <th style="width: 80%"><font color="#FF0000">description</th> |
| + | </tr> | ||
| + | <tr> | ||
| + | <td><font color="#ffdd33">menu</td> | ||
| + | <td>Access all worn collars, locked or unlocked</td> | ||
| + | </tr> | ||
| + | <tr> | ||
| + | <td><font color="#ffdd33">yank</td> | ||
| + | <td>yank all the leashed collars to your hand to make them moving close to you</td> | ||
| + | </tr> | ||
| + | <tr> | ||
| + | <td><font color="#ffdd33">store</td> | ||
| + | <td>store all leashed collars to your hand if they are in one of the pony mode</td> | ||
| + | </tr> | ||
| + | <tr> | ||
| + | <td><font color="#ffdd33">mlon</td> | ||
| + | <td>toggle all locked and leashed collars to your hands to forced mouselook</td> | ||
| + | </tr> | ||
| + | <tr> | ||
| + | <td><font color="#ffdd33">mloff</td> | ||
| + | <td>Release all locked and leashed collars to your hand from forced mouselook</td> | ||
| + | </tr> | ||
| + | <tr> | ||
| + | <td><font color="#ffdd33">zap</td> | ||
| + | <td>Zap all leashed collars to your hands</td> | ||
| + | </tr> | ||
| + | <tr> | ||
| + | <td><font color="#ffdd33">grab</td> | ||
| + | <td>Grab the leash from all availabke collars</td> | ||
| + | </tr> | ||
| + | <tr> | ||
| + | <td><font color="#ffdd33">unleash</td> | ||
| + | <td>Unleash all leashed collars from your hands</td> | ||
</tr> | </tr> | ||
<tr> | <tr> | ||
| − | <td> | + | <td><font color="#ffdd33">length</td> |
| − | <td> | + | <td>Adjust the leash length from all the collars leashed to you</td> |
</tr> | </tr> | ||
<tr> | <tr> | ||
| − | <td> | + | <td><font color="#ffdd33">leashto</td> |
| − | <td> | + | <td>Leash transfer from your hand to the compatible PFS leash post</td> |
</tr> | </tr> | ||
<tr> | <tr> | ||
| − | <td> | + | <td><font color="#ffdd33">take</td> |
| − | <td> | + | <td>Leash transfer from compatible PFS leash post to your hand</td> |
</tr> | </tr> | ||
</table> | </table> | ||
| − | <br | + | <br> |
| − | + | <p>[[File:Warning64.png|frameless|left]]The commands only works in a range of 20m</p><br><br> | |
| − | < | + | <p> if you want to focus on one collar in particular, you can use the <span strong style="color: #c75399">target</span> mode and select the one from the list. the selected avatar will be displayed down right with its collar prefix</p> |
| − | + | [[File:Staff hud target.png|frameless|center]] | |
| − | + | ||
| − | |||
| − | [[File: | ||
| − | <br | ||
| − | <p> | ||
| − | [[File: | ||
| − | |||
<!--=====================================================--> | <!--=====================================================--> | ||
| − | <!-- | + | <!--2.0 Resizing --> |
<!--=====================================================--> | <!--=====================================================--> | ||
| − | <h4><p style="text-align:left; color: #fe5656;border: 2px solid gray;padding: 10px;"> | + | <h4><p style="text-align:left; color: #fe5656;border: 2px solid gray;padding: 10px;"> 2. HUD resizing</p></h4> |
| − | <p>The HUD can be resized at your willing up to a minimum size that the mesh allows. If you want to change the size, right click the worn <span style="color: #ffdd33">[PFS] Staff HUD | + | <p>The HUD can be resized at your willing up to a minimum size that the mesh allows. If you want to change the size, right click the worn <span style="color: #ffdd33">[PFS] Staff HUD</span> and select <span style="color: #ffdd33">edit</span></p> |
<br/> | <br/> | ||
[[File:Warning64.png|frameless|left]] <p>if you cannot see the worn HUD on your screen, it may be rezzed outside your screen area, you can hold the key <span style="color: #ffdd33">alt</span> pressed and <span style="color: #ffdd33">roll</span> the mouse wheel to adjust temporarily the screen scaling. You should be able to locate your HUD and move it to the center</p> | [[File:Warning64.png|frameless|left]] <p>if you cannot see the worn HUD on your screen, it may be rezzed outside your screen area, you can hold the key <span style="color: #ffdd33">alt</span> pressed and <span style="color: #ffdd33">roll</span> the mouse wheel to adjust temporarily the screen scaling. You should be able to locate your HUD and move it to the center</p> | ||
<br/> | <br/> | ||
| − | [[File: | + | [[File:Staff hud resize menu.png|center]] |
<br/> | <br/> | ||
<p>once the edit window is open you can hold the keys <span style="color: #ffdd33">shift + control</span> and grab one of the handle from one of the corner</p> | <p>once the edit window is open you can hold the keys <span style="color: #ffdd33">shift + control</span> and grab one of the handle from one of the corner</p> | ||
| − | [[File: | + | [[File:Staff hud resize menu2.png|center]] |
<br/> | <br/> | ||
<p>keep <span style="color: #ffdd33">shift + control</span> pressed, <span style="color: #ffdd33">right click</span> the mouse on the handle and <span style="color: #ffdd33">move</span> the mouse on the scale to your desired size </p> | <p>keep <span style="color: #ffdd33">shift + control</span> pressed, <span style="color: #ffdd33">right click</span> the mouse on the handle and <span style="color: #ffdd33">move</span> the mouse on the scale to your desired size </p> | ||
| − | [[File: | + | [[File:Staff hud resize menu3.png|center]] |
<br/> | <br/> | ||
<p>When the HUD has reached the desired size you can release all mouse button and keyboard keys, you can also close the edit window. The HUD will take a little time to resize all the elements, give it some seconds.</p> | <p>When the HUD has reached the desired size you can release all mouse button and keyboard keys, you can also close the edit window. The HUD will take a little time to resize all the elements, give it some seconds.</p> | ||
Latest revision as of 09:04, 6 December 2021
The PFS Staff HUD
To help the staff in there daily work at PFS, a staff HUD is available from every PFS collar with version 7.27 or higher.
The staff HUD is also avalaible at the so called sofa area.
Contents
1. The HUD interface
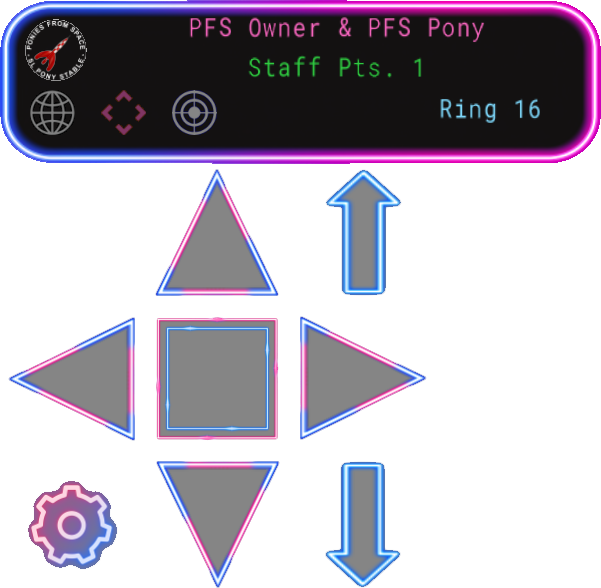
The PFS Staff HUD is a useful tool that help any staff or pony in its daily activities around PFS. It has been designed to make your life easier. The main HUD gives you several informations regarding your position at PFS
The first line display your staff position and pony rank, if you have. If you have none you will be displayed as pressed and PFS Guest
The second line display your actual week points as PFS staff
If you are a lucky PFS Pony that owns a stall at PFS barn, the ring where you are leashed on store command is displeyd down right
The HUD have differents buttons with the following features:
Access the integrated web browser to get your personnal informations regarding your activities at PFS as staff and the PFS Cargo System
Access the Whip Commands HUD for carting and whip circle
Access the PFS Collar Shortcuts HUD
Access this page or use it as Compass to navigate through PFS regions to deliver your goods using the PFS Cargo System
If you are not a PFS staff, the Collar Shortcuts HUD won't be allowed to get accessed, but the rest of the HUD is still working. So anyone can use it as a free Whip HUD or use it with the PFS Cargo System
1.1 The PFS Cargo System tab
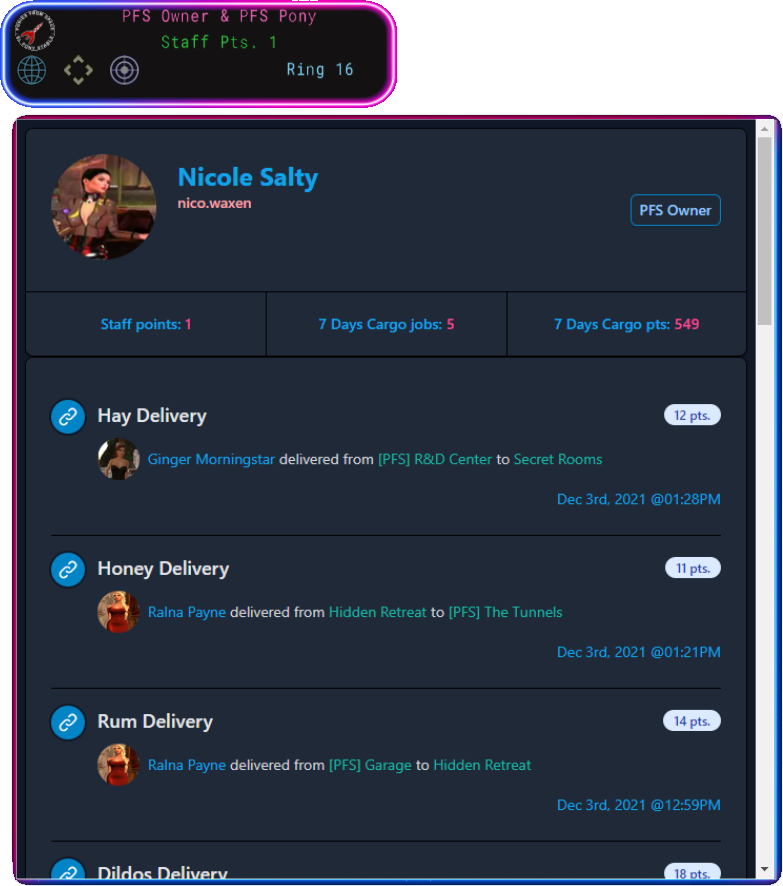
This page list all the goods you have carried using the PFS Cargo System, as driver or pony. The top of the page gives you your weekly activities points at PFS as staff, the numbers of carried goods and the related points given by them
1.2 The whip tab
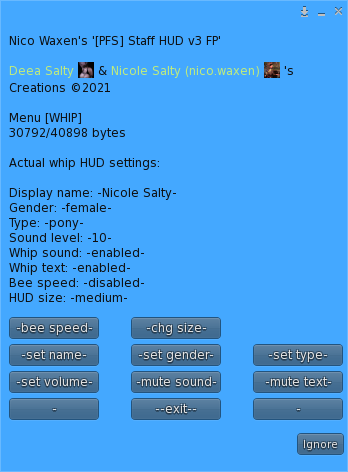
This tab will help you to give orders to your pony for the usual ponyplay like carting, whip circle, etc...You can get a menu to adjust the settings to your liking using the 
| setting | description |
|---|---|
| -set volume- | changes the volume of the played sounds, from 0 (no sound) to 10 (maximaum) |
| -mute sound- | toggles the mute sound enabled/disabled |
| -mute text- | toggles the mute text enabled/disabled |
| -set name- | sets a custom display name used for the text chat |
| -set gender- | selects the gender you want to use for the text chat male/neutral/female, it also toggle the sound expression gender |
| -set type- | selects the type of animal for the text chat |
| -bee speed- | disables all the blinking animations to increases the speed, careful on the sound mess! |
| -chg size- | toggle the Whip HUD size to 3 sizes: small, medium & big |
1.3 The collar tab
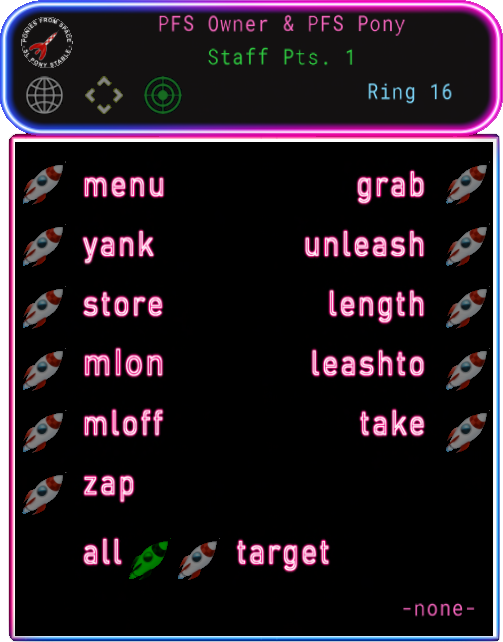
This tab will help you to use the PFS collar features by using buttons instead of the command line. The available commands are:
| function | description |
|---|---|
| menu | Access all worn collars, locked or unlocked |
| yank | yank all the leashed collars to your hand to make them moving close to you |
| store | store all leashed collars to your hand if they are in one of the pony mode |
| mlon | toggle all locked and leashed collars to your hands to forced mouselook |
| mloff | Release all locked and leashed collars to your hand from forced mouselook |
| zap | Zap all leashed collars to your hands |
| grab | Grab the leash from all availabke collars |
| unleash | Unleash all leashed collars from your hands |
| length | Adjust the leash length from all the collars leashed to you |
| leashto | Leash transfer from your hand to the compatible PFS leash post |
| take | Leash transfer from compatible PFS leash post to your hand |
The commands only works in a range of 20m
if you want to focus on one collar in particular, you can use the target mode and select the one from the list. the selected avatar will be displayed down right with its collar prefix
2. HUD resizing
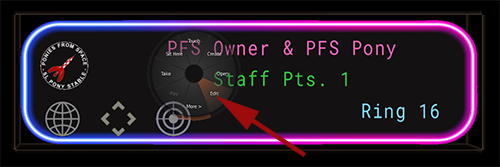
The HUD can be resized at your willing up to a minimum size that the mesh allows. If you want to change the size, right click the worn [PFS] Staff HUD and select edit
if you cannot see the worn HUD on your screen, it may be rezzed outside your screen area, you can hold the key alt pressed and roll the mouse wheel to adjust temporarily the screen scaling. You should be able to locate your HUD and move it to the center
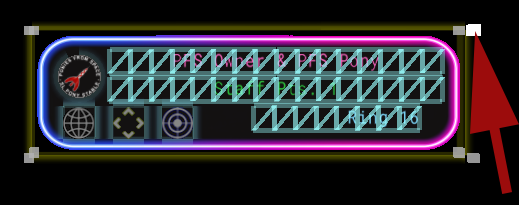
once the edit window is open you can hold the keys shift + control and grab one of the handle from one of the corner
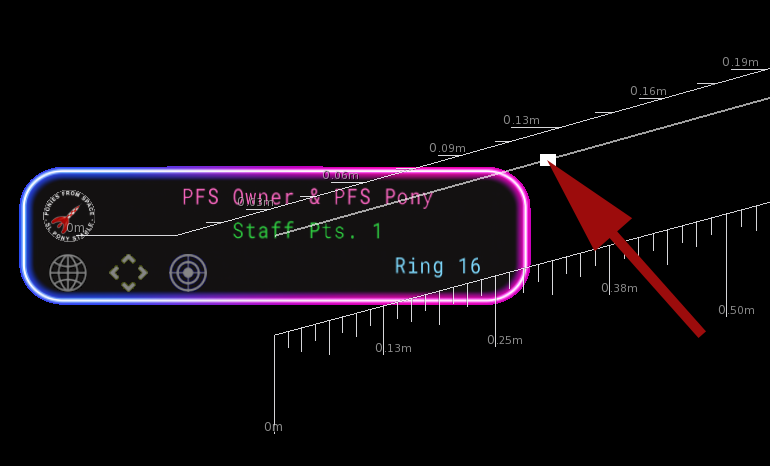
keep shift + control pressed, right click the mouse on the handle and move the mouse on the scale to your desired size
When the HUD has reached the desired size you can release all mouse button and keyboard keys, you can also close the edit window. The HUD will take a little time to resize all the elements, give it some seconds.


