Difference between revisions of "PFS HarnessGag"
m |
m |
||
| (46 intermediate revisions by the same user not shown) | |||
| Line 1: | Line 1: | ||
__TOC__ | __TOC__ | ||
[[File:HG worn.png|center]] | [[File:HG worn.png|center]] | ||
| − | <h1><p style="text-align:center; color: #fe5656;font-size: 60px"> [PFS] Harness gag v1</p></h1> | + | <h1><p style="text-align:center; color: #fe5656;font-size: 60px"> [PFS] Harness gag v1.1</p></h1> |
<p>The [PFS] Harness gag is a bondage gear (not rigged and compatible to any head) to restrict your talk and view, mostly dedicated to ponyplay, it can be used in many other disciplines, you will be able to:</br> | <p>The [PFS] Harness gag is a bondage gear (not rigged and compatible to any head) to restrict your talk and view, mostly dedicated to ponyplay, it can be used in many other disciplines, you will be able to:</br> | ||
- lock/unlock with RLV or RLVa</br> | - lock/unlock with RLV or RLVa</br> | ||
| Line 9: | Line 9: | ||
- leash with auto turn and auto TP to leash holder</br> | - leash with auto turn and auto TP to leash holder</br> | ||
- apply view masks following style and color of the harness gag</br> | - apply view masks following style and color of the harness gag</br> | ||
| + | - apply vision restrictions like ML, cam lilit or focus your keyholder body</br> | ||
- show/hide accessories (ears, blinders, tag or lashes)</br> | - show/hide accessories (ears, blinders, tag or lashes)</br> | ||
- use RL/SL timer </br> | - use RL/SL timer </br> | ||
| Line 18: | Line 19: | ||
- add your own access script (example is provided)</br></p> | - add your own access script (example is provided)</br></p> | ||
</br> | </br> | ||
| − | + | <!--=====================================================--> | |
| − | < | + | <!--1. Generalities --> |
| + | <!--=====================================================--> | ||
<h1><p style="text-align:center; color: #fe5656;font-size: 60px">1. Generalities</p></h1> | <h1><p style="text-align:center; color: #fe5656;font-size: 60px">1. Generalities</p></h1> | ||
<p> | <p> | ||
<p>This bondage gear is the result of the cooperation with Filly Heartsong who did the mesh design. We both put together our long experience in mesh design and scripting to provide you an unique gear. Because we care we are open to listen all your comments and suggestions, as long it will help to get a better product!</p> | <p>This bondage gear is the result of the cooperation with Filly Heartsong who did the mesh design. We both put together our long experience in mesh design and scripting to provide you an unique gear. Because we care we are open to listen all your comments and suggestions, as long it will help to get a better product!</p> | ||
<br><hr><br> | <br><hr><br> | ||
| − | <h2><p style="text-align:center; color: #fe5656;font-size: 40px"> 1.1 RLV</p></h2> | + | <!--=====================================================--> |
| + | <!--1.1 RLV --> | ||
| + | <!--=====================================================--> | ||
| + | <h2><p style="text-align:center; color: #fe5656;font-size: 40px">1.1 RLV</p></h2> | ||
<p>As a viewer standard, RLV restrictions are filtered to the object UUID and if your object uses same restrictions for several functions, you may run into trouble and the result may look a way different than expected. Thay's why RLV, here, is managed to the script level. You can have several scripts triggering restrictions w/o any interactions between them. You can easily follows the object restrictions table from the RLV menu.</br>Both RLV and RLVa are supported here but for some special features like screen overlay an addition attachement is required for RLV users. Even if most of us uses RLVa viewers today we still need to make things compatible to previous standards.</p> | <p>As a viewer standard, RLV restrictions are filtered to the object UUID and if your object uses same restrictions for several functions, you may run into trouble and the result may look a way different than expected. Thay's why RLV, here, is managed to the script level. You can have several scripts triggering restrictions w/o any interactions between them. You can easily follows the object restrictions table from the RLV menu.</br>Both RLV and RLVa are supported here but for some special features like screen overlay an addition attachement is required for RLV users. Even if most of us uses RLVa viewers today we still need to make things compatible to previous standards.</p> | ||
<br><hr><br> | <br><hr><br> | ||
| − | <h2><p style="text-align:center; color: #fe5656;font-size: 40px"> 1.2 Access</p></h2> | + | <!--=====================================================--> |
| + | <!--1.2 Access --> | ||
| + | <!--=====================================================--> | ||
| + | <h2><p style="text-align:center; color: #fe5656;font-size: 40px">1.2 Access</p></h2> | ||
<p>The menu access is build in an inovative way. As standard, everyone can access the menu, with different access levels. Access levels are:</br> | <p>The menu access is build in an inovative way. As standard, everyone can access the menu, with different access levels. Access levels are:</br> | ||
- public</br> | - public</br> | ||
| Line 38: | Line 46: | ||
The use of the API allows you to override the actual keyholder, this will help you to implement your own access list from wherever you want. You can implement "key grabbing" scripts as much you want they are asked one after the other. For more info look at the included public access script "plug.access.public".</br> | The use of the API allows you to override the actual keyholder, this will help you to implement your own access list from wherever you want. You can implement "key grabbing" scripts as much you want they are asked one after the other. For more info look at the included public access script "plug.access.public".</br> | ||
<br><hr><br> | <br><hr><br> | ||
| − | <h2><p style="text-align:center; color: #fe5656;font-size: 40px"> 1.3 Configurable</p></h2> | + | <!--=====================================================--> |
| + | <!--1.3 Configurable --> | ||
| + | <!--=====================================================--> | ||
| + | <h2><p style="text-align:center; color: #fe5656;font-size: 40px">1.3 Configurable</p></h2> | ||
<p>The object includes notecards to configure it, you can modify them at your own risk:</br> | <p>The object includes notecards to configure it, you can modify them at your own risk:</br> | ||
- logo: list of textures for the tag logo.</br> | - logo: list of textures for the tag logo.</br> | ||
- maskenv: list of extra masks textures (if you want to add some more) and list of the EEP environment presets.</br> | - maskenv: list of extra masks textures (if you want to add some more) and list of the EEP environment presets.</br> | ||
<br><hr><br> | <br><hr><br> | ||
| − | <h2><p style="text-align:center; color: #fe5656;font-size: 40px"> 1.4 API</p></h2> | + | <!--=====================================================--> |
| + | <!--1.4 API --> | ||
| + | <!--=====================================================--> | ||
| + | <h2><p style="text-align:center; color: #fe5656;font-size: 40px">1.4 API</p></h2> | ||
<p>Objects you cannot mod are no fun, that's why you will find here an integrated API that will allows you make your own key grabbing script. plug.access.public is a script, full mod and documented, to make your own.</br> | <p>Objects you cannot mod are no fun, that's why you will find here an integrated API that will allows you make your own key grabbing script. plug.access.public is a script, full mod and documented, to make your own.</br> | ||
<br><hr><br> | <br><hr><br> | ||
| − | <h2><p style="text-align:center; color: #fe5656;font-size: 40px"> 1.5 Integrated help</p></h2> | + | <!--=====================================================--> |
| + | <!--1.5 Integrated help --> | ||
| + | <!--=====================================================--> | ||
| + | <h2><p style="text-align:center; color: #fe5656;font-size: 40px">1.5 Integrated help</p></h2> | ||
<p>To make it accessible and easy to use, the object menus have a "help" feature to stream in your chat window some general informations regarding the actual menu displayed to help you to understand what does every buttons.</br> | <p>To make it accessible and easy to use, the object menus have a "help" feature to stream in your chat window some general informations regarding the actual menu displayed to help you to understand what does every buttons.</br> | ||
<br><hr><br> | <br><hr><br> | ||
| − | <h2><p style="text-align:center; color: #fe5656;font-size: 40px"> 1.6 Truekey</p></h2> | + | <!--=====================================================--> |
| + | <!--1.6 Truekey --> | ||
| + | <!--=====================================================--> | ||
| + | <h2><p style="text-align:center; color: #fe5656;font-size: 40px">1.6 Truekey</p></h2> | ||
<p>The only way to unlock the object is the use of the key held by the keyholder. In case you are stuck or the keyholder not showing back you can, if seted up previously, use the Truekey feature to get unlocked by everyone having the key password. You can access it, set it up and use it fromt he "Tools" menu.</br> | <p>The only way to unlock the object is the use of the key held by the keyholder. In case you are stuck or the keyholder not showing back you can, if seted up previously, use the Truekey feature to get unlocked by everyone having the key password. You can access it, set it up and use it fromt he "Tools" menu.</br> | ||
<br><hr><br> | <br><hr><br> | ||
| + | <!--=====================================================--> | ||
| + | <!--2. Harness gag features --> | ||
| + | <!--=====================================================--> | ||
<h1><p style="text-align:center; color: #fe5656;font-size: 60px">2. Harness gag features</p></h1> | <h1><p style="text-align:center; color: #fe5656;font-size: 60px">2. Harness gag features</p></h1> | ||
| − | <h2><p style="text-align:center; color: #fe5656;font-size: 40px"> 2.1 Main menu</p></h2> | + | <!--=====================================================--> |
| + | <!--2.1 Main menu --> | ||
| + | <!--=====================================================--> | ||
| + | <h2><p style="text-align:center; color: #fe5656;font-size: 40px">2.1 Main menu</p></h2> | ||
<p>The main menu provides you an access to all the functions. You can access it if you touch me or use the command line in the of 5m range. Command line is on channel 7 and is built with the 2 first letters of the username followed by the type of the gear: gag here... Example for 'nikki resident' gag you will type <span style="color: #ffdd33">/7nigag</span> (you will be noticed if the user has a customized prefix). You can also replace the prefix with '*' to get all users menus. Keyholder are not concerned by the distance limit but take in account the talk range limit.</p> | <p>The main menu provides you an access to all the functions. You can access it if you touch me or use the command line in the of 5m range. Command line is on channel 7 and is built with the 2 first letters of the username followed by the type of the gear: gag here... Example for 'nikki resident' gag you will type <span style="color: #ffdd33">/7nigag</span> (you will be noticed if the user has a customized prefix). You can also replace the prefix with '*' to get all users menus. Keyholder are not concerned by the distance limit but take in account the talk range limit.</p> | ||
| − | [[File:HG menu main.png|center]]<br> | + | [[File:HG menu main 2.png|center]]<br> |
<p><span style="color: #00ff00">⍰ HELP ⍰</span> – Streams the help into the chat window.<br> | <p><span style="color: #00ff00">⍰ HELP ⍰</span> – Streams the help into the chat window.<br> | ||
<span style="color: #00ff00">⏏ EXIT ⏏</span> – Close the actual menu and release the menu access to anyone. If not, the access menu will timeout after 300s of no use. Keyholder always have the priority to access the menu even if used by someone else. The actual menu user will be noticed for any attempt to access the menu (fail or success).<br> | <span style="color: #00ff00">⏏ EXIT ⏏</span> – Close the actual menu and release the menu access to anyone. If not, the access menu will timeout after 300s of no use. Keyholder always have the priority to access the menu even if used by someone else. The actual menu user will be noticed for any attempt to access the menu (fail or success).<br> | ||
| Line 68: | Line 94: | ||
<span style="color: #00ff00">leash</span> - Sub-menu for the leash function.<br> | <span style="color: #00ff00">leash</span> - Sub-menu for the leash function.<br> | ||
<span style="color: #00ff00">style</span> - Sub-menu for the style of the gag.<br> | <span style="color: #00ff00">style</span> - Sub-menu for the style of the gag.<br> | ||
| − | <span style="color: #00ff00">view</span> - Sub-menu for the view function.<br></p> | + | <span style="color: #00ff00">view</span> - Sub-menu for the view function.<br> |
| + | <span style="color: #00ff00">vision</span> - Sub-menu for the vision function.<br></p> | ||
<br><hr> | <br><hr> | ||
| − | <h2><p style="text-align:center; color: #fe5656;font-size: 40px"> 2.2 Tools menu</p></h2> | + | <!--=====================================================--> |
| + | <!--2.1.1 Unlock menu --> | ||
| + | <!--=====================================================--> | ||
| + | <h3><p style="text-align:center; color: #fe5656;font-size: 40px">2.1.1 Unlock menu</p></h3> | ||
| + | <p>When unlocking you get some options, you can either call the default settings back to put the harness gag to its initial state, or keep the settings as they are so the harness gag will take the last use settings</p> | ||
| + | [[File:HG unlock menu.png|center]]<br> | ||
| + | <span style="color: #00ff00">YES</span> – All the settings except style are reseted to there default values.<br> | ||
| + | <span style="color: #00ff00">NO</span> – All the settings are left as they are, at the next lock all restrictions will be applied again.<br> | ||
| + | <span style="color: #00ff00">MENU</span> – Get the main menu back.<br> | ||
| + | <p><span style="color: #ffdd33">NOTE:</span> timeout for this menu is shorter than the standard 300s, only 10s!.</p> | ||
| + | <br><hr> | ||
| + | <!--=====================================================--> | ||
| + | <!--2.2 Tools menu --> | ||
| + | <!--=====================================================--> | ||
| + | <h2><p style="text-align:center; color: #fe5656;font-size: 40px">2.2 Tools menu</p></h2> | ||
[[File:HG menu tools.png|center]]<br> | [[File:HG menu tools.png|center]]<br> | ||
<p><span style="color: #00ff00">⍰ HELP ⍰</span> – Streams the help into the chat window.<br> | <p><span style="color: #00ff00">⍰ HELP ⍰</span> – Streams the help into the chat window.<br> | ||
| Line 83: | Line 124: | ||
<span style="color: #00ff00">RLSD</span> – Reset the linkset data and restart all scripts, default material preset will be applied.<br></p> | <span style="color: #00ff00">RLSD</span> – Reset the linkset data and restart all scripts, default material preset will be applied.<br></p> | ||
<br><hr> | <br><hr> | ||
| − | <h2><p style="text-align:center; color: #fe5656;font-size: 40px"> 2.3 RLV menu</p></h2> | + | <!--=====================================================--> |
| + | <!--2.3 RLV menu --> | ||
| + | <!--=====================================================--> | ||
| + | <h2><p style="text-align:center; color: #fe5656;font-size: 40px">2.3 RLV menu</p></h2> | ||
<p>Universal scripts must deal with different configurations where sometimes same restrictions can be triggered by two scripts. That’s why here RLV restrictions are managed in a unique way. The goal is to keep things working as they should and especially when restrictions are lifted. All active restrictions are listed with the restriction itself like <span style="color: #ffdd33">sendchat=n</span> and the script which triggered it <span style="color: #ffdd33">from sub.gag.headharness</span>.</p> | <p>Universal scripts must deal with different configurations where sometimes same restrictions can be triggered by two scripts. That’s why here RLV restrictions are managed in a unique way. The goal is to keep things working as they should and especially when restrictions are lifted. All active restrictions are listed with the restriction itself like <span style="color: #ffdd33">sendchat=n</span> and the script which triggered it <span style="color: #ffdd33">from sub.gag.headharness</span>.</p> | ||
[[File:HG menu RLV.png|center]]<br> | [[File:HG menu RLV.png|center]]<br> | ||
| Line 93: | Line 137: | ||
[[File:HG menu RLV example.png|center]]<br> | [[File:HG menu RLV example.png|center]]<br> | ||
<br><hr> | <br><hr> | ||
| − | <h2><p style="text-align:center; color: #fe5656;font-size: 40px"> 2.4 Timer menu</p></h2> | + | <!--=====================================================--> |
| − | <p style="color: #ffdd33">NOTE: When the timer runs out, the key is given back to the user. No one will be able to grab it except if they are some "key grabbing" plugin scripts installed.</p> | + | <!--2.4 Timer menu --> |
| + | <!--=====================================================--> | ||
| + | <h2><p style="text-align:center; color: #fe5656;font-size: 40px">2.4 Timer menu</p></h2> | ||
| + | <p><span style="color: #ffdd33">NOTE:</span> When the timer runs out, the key is given back to the user. No one will be able to grab it except if they are some "key grabbing" plugin scripts installed.</p> | ||
<p>The timer can be RL or SL time, you can switch from one to another w/o resetting the time left. Wearer can set a timer and do some self-bondage, once started the timer cannot be stopped except if someone else grab the key and get the keyholder access level.</p> | <p>The timer can be RL or SL time, you can switch from one to another w/o resetting the time left. Wearer can set a timer and do some self-bondage, once started the timer cannot be stopped except if someone else grab the key and get the keyholder access level.</p> | ||
<gallery mode="slideshow"> | <gallery mode="slideshow"> | ||
| Line 117: | Line 164: | ||
<span style="color: #00ff00">+24h</span> – Add 24 hours to the actual timer value.<br></p> | <span style="color: #00ff00">+24h</span> – Add 24 hours to the actual timer value.<br></p> | ||
<br><hr> | <br><hr> | ||
| − | <h2><p style="text-align:center; color: #fe5656;font-size: 40px"> 2.5 Gag menu</p></h2> | + | <!--=====================================================--> |
| − | <p style="color: #ffdd33">NOTE: The restrictions are only active when the object is locked, and a gag type is applied.</p> | + | <!--2.5 Gag menu --> |
| + | <!--=====================================================--> | ||
| + | <h2><p style="text-align:center; color: #fe5656;font-size: 40px">2.5 Gag menu</p></h2> | ||
| + | <p><span style="color: #ffdd33">NOTE:</span> The restrictions are only active when the object is locked, and a gag type is applied.</p> | ||
<gallery mode="slideshow"> | <gallery mode="slideshow"> | ||
Image:HG menu gag1b.png | Image:HG menu gag1b.png | ||
| Line 149: | Line 199: | ||
---- | ---- | ||
<p>You can select up to 5 differents gags from the gag menu:</p> | <p>You can select up to 5 differents gags from the gag menu:</p> | ||
| − | <gallery> | + | <gallery mode="slideshow"> |
File:HG gag ball.png|ball gag | File:HG gag ball.png|ball gag | ||
File:HG gag bit.png|bit | File:HG gag bit.png|bit | ||
| Line 158: | Line 208: | ||
<p>Since the object is not rigged you can easily adjust the gags to your head by editing the object.</p> | <p>Since the object is not rigged you can easily adjust the gags to your head by editing the object.</p> | ||
<br><hr> | <br><hr> | ||
| − | <h2><p style="text-align:center; color: #fe5656;font-size: 40px"> 2.6 Leash menu</p></h2> | + | <!--=====================================================--> |
| + | <!--2.6 Leash menu --> | ||
| + | <!--=====================================================--> | ||
| + | <h2><p style="text-align:center; color: #fe5656;font-size: 40px">2.6 Leash menu</p></h2> | ||
<p>If you use the smart leash holder available from the [tools] menu you can make the wearer following you when leashed even through TP. As soon as the distance between the leash holder and the wearer is greater than 2 times the leash length a TP is send to the wearer. | <p>If you use the smart leash holder available from the [tools] menu you can make the wearer following you when leashed even through TP. As soon as the distance between the leash holder and the wearer is greater than 2 times the leash length a TP is send to the wearer. | ||
If the leash holder is not detected in the same region, a leash timeout is triggered after 300s and the wearer will be unleashed.</p> | If the leash holder is not detected in the same region, a leash timeout is triggered after 300s and the wearer will be unleashed.</p> | ||
| Line 175: | Line 228: | ||
<span style="color: #00ff00">rope ✔</span> – Leash is a rope.<br></p> | <span style="color: #00ff00">rope ✔</span> – Leash is a rope.<br></p> | ||
<br><hr> | <br><hr> | ||
| − | <h2><p style="text-align:center; color: #fe5656;font-size: 40px"> 2.7 View menu</p></h2> | + | <!--=====================================================--> |
| + | <!--2.7 View menu --> | ||
| + | <!--=====================================================--> | ||
| + | <h2><p style="text-align:center; color: #fe5656;font-size: 40px">2.7 View menu</p></h2> | ||
[[File:HG menu viewb.png|center]]<br> | [[File:HG menu viewb.png|center]]<br> | ||
<p><span style="color: #00ff00">⍰ HELP ⍰</span> – Streams the help into the chat window.<br> | <p><span style="color: #00ff00">⍰ HELP ⍰</span> – Streams the help into the chat window.<br> | ||
| Line 186: | Line 242: | ||
<span style="color: #00ff00">clear ✔</span> - Reset all mask & environment settings back to default values. ✔means the settings are on default values.<br></p> | <span style="color: #00ff00">clear ✔</span> - Reset all mask & environment settings back to default values. ✔means the settings are on default values.<br></p> | ||
<br><hr> | <br><hr> | ||
| − | <h3><p style="text-align:center; color: #fe5656;font-size: 40px"> 2.7.1 Mask menu</p></h3> | + | <!--=====================================================--> |
| + | <!--2.7.1 Mask menu --> | ||
| + | <!--=====================================================--> | ||
| + | <h3><p style="text-align:center; color: #fe5656;font-size: 40px">2.7.1 Mask menu</p></h3> | ||
<p>The list of available masks is variable and build from the <span style="color: #ffdd33">maskenv</span> notecard and those that are manually added from the <span style="color: #ffdd33">add</span> menu. In addition the <span style="color: #ffdd33">auto</span> setting will force the user to get a mask depending on the shown accessories, the <span style="color: #ffdd33">strap in</span> texture and the color.</p> | <p>The list of available masks is variable and build from the <span style="color: #ffdd33">maskenv</span> notecard and those that are manually added from the <span style="color: #ffdd33">add</span> menu. In addition the <span style="color: #ffdd33">auto</span> setting will force the user to get a mask depending on the shown accessories, the <span style="color: #ffdd33">strap in</span> texture and the color.</p> | ||
[[File:HG menu view mask.png|center]]<br> | [[File:HG menu view mask.png|center]]<br> | ||
| Line 199: | Line 258: | ||
<br><hr> | <br><hr> | ||
<p>Examples of <span style="color: #ffdd33">auto</span> masks:</p> | <p>Examples of <span style="color: #ffdd33">auto</span> masks:</p> | ||
| − | <gallery> | + | <gallery mode="slideshow"> |
File:HG mask strap.png|leather beige strap | File:HG mask strap.png|leather beige strap | ||
File:HG mask strap lashesB.png|leather red strap & lashes | File:HG mask strap lashesB.png|leather red strap & lashes | ||
| Line 206: | Line 265: | ||
</gallery> | </gallery> | ||
<br><hr> | <br><hr> | ||
| − | <h4><p style="text-align:center; color: #fe5656;font-size: 40px"> 2.7.1.1 Add mask menu</p></h4> | + | <!--=====================================================--> |
| + | <!--2.7.1.1 Add mask menu --> | ||
| + | <!--=====================================================--> | ||
| + | <h4><p style="text-align:center; color: #fe5656;font-size: 40px">2.7.1.1 Add mask menu</p></h4> | ||
[[File:HG menu mask add.png|center]]<br> | [[File:HG menu mask add.png|center]]<br> | ||
<p>Format is <span style="color: #ffdd33"><texture_uuid></span>,<span style="color: #ffdd33"><name></span>[,<span style="color: #ffdd33"><color_name></span>]. Name length is limited to 8 letters and must be unique. Color is optional and can be: amethyst, azure, black, blood, blue, copper, D.green, F.pink, gold, indigo, L.red, L.yellow, lime, metal, navy, orange, P.pink, plum, purple, red, slate, silver, steel, yellow, white, custom.A or custom.B</p> | <p>Format is <span style="color: #ffdd33"><texture_uuid></span>,<span style="color: #ffdd33"><name></span>[,<span style="color: #ffdd33"><color_name></span>]. Name length is limited to 8 letters and must be unique. Color is optional and can be: amethyst, azure, black, blood, blue, copper, D.green, F.pink, gold, indigo, L.red, L.yellow, lime, metal, navy, orange, P.pink, plum, purple, red, slate, silver, steel, yellow, white, custom.A or custom.B</p> | ||
<p>Example: <span style="color: #ffdd33">004dd4ed-b5fe-3b36-cf6d-8b97024473c6,2Bholes,black</span> for a black mask with the 2 big holes.</p> | <p>Example: <span style="color: #ffdd33">004dd4ed-b5fe-3b36-cf6d-8b97024473c6,2Bholes,black</span> for a black mask with the 2 big holes.</p> | ||
<br><hr> | <br><hr> | ||
| − | <h4><p style="text-align:center; color: #fe5656;font-size: 40px"> 2.7.1.2 Delete mask menu</p></h4> | + | <!--=====================================================--> |
| + | <!--2.7.1.2 Delete mask menu --> | ||
| + | <!--=====================================================--> | ||
| + | <h4><p style="text-align:center; color: #fe5656;font-size: 40px">2.7.1.2 Delete mask menu</p></h4> | ||
[[File:HG menu mask delete.png|center]]<br> | [[File:HG menu mask delete.png|center]]<br> | ||
<p>Select the mask you want to remove from the list, you can only delete those which has been added manually.</p> | <p>Select the mask you want to remove from the list, you can only delete those which has been added manually.</p> | ||
<br><hr> | <br><hr> | ||
| + | <!--=====================================================--> | ||
| + | <!--2.7.1.3 Transparency menu --> | ||
| + | <!--=====================================================--> | ||
| + | <h4><p style="text-align:center; color: #fe5656;font-size: 40px">2.7.1.3 Transparency menu</p></h4> | ||
| + | <p>You can adjust the transparency of the mask.</p> | ||
| + | [[File:HG menu mask transparency.png|center]]<br> | ||
| + | <p><span style="color: #00ff00">⇫ BACK ⇫</span> – Move back to the previous menu.<br> | ||
| + | <span style="color: #00ff00">0%</span> – Make the mask opaque.<br> | ||
| + | <span style="color: #00ff00">100%</span> – Make the mask transparent.<br> | ||
| + | <span style="color: #00ff00">-10%</span> – Reduce the transparency by 10%.<br> | ||
| + | <span style="color: #00ff00">50%</span> – Make the mask half transparent.<br> | ||
| + | <span style="color: #00ff00">+10%</span> – Increase the transparency by 10%.<br></p> | ||
| + | <br><hr> | ||
| + | <!--=====================================================--> | ||
| + | <!--2.7.1.3 Color menu --> | ||
| + | <!--=====================================================--> | ||
| + | <h4><p style="text-align:center; color: #fe5656;font-size: 40px">2.7.1.3 Color menu</p></h4> | ||
| + | <p>You can change the base color of the mask to adjust it to your liking, in addition you can also make the color cycling. Best result only one white based mask.</p> | ||
| + | <gallery mode="slideshow"> | ||
| + | Image:HG menu mask color.png|page 1/4 | ||
| + | Image:HG menu mask color2.png|page 2/4 | ||
| + | Image:HG menu mask color3.png|page 3/4 | ||
| + | Image:HG menu mask color4.png|page 4/4 | ||
| + | </gallery> | ||
| + | <p><span style="color: #00ff00">⇫ BACK ⇫</span> – Move back to the previous menu.<br> | ||
| + | <span style="color: #00ff00">⇦ PREVIOUS</span> - Move back to the previous page.<br> | ||
| + | <span style="color: #00ff00">NEXT ⇨</span> - Move forward to the next page.<br> | ||
| + | <span style="color: #00ff00">⍰ HELP ⍰</span> – Streams the help into the chat window.<br> | ||
| + | <span style="color: #00ff00">D.green, F.pink, L.red, L,yellow, P.pink, amethyst, azure, black, blood, blue, copper, custom.A, custom.B, gold, indigo,lime, metal, navy, orange, plum, purple, red, silver, slate, steel, white, yellow</span> – Select the color preset for the mask.<br> | ||
| + | <span style="color: #00ff00">RGB.A, RGB.B</span> – Enter the new value for custom.A or custom.B color. Example <123/123/123><br> | ||
| + | <span style="color: #00ff00">cycle ✘</span> – No color cycling.<br> | ||
| + | <span style="color: #00ff00">cycle ✔</span> – Mask color is cycling to randoms values. Every defined time a new color is randomly selected and the mask change to the next value with gradient.<br> | ||
| + | <span style="color: #00ff00">time</span> – Enter a new cycle time for color change.<br></p> | ||
| + | <br><hr> | ||
| + | <!--=====================================================--> | ||
| + | <!--2.7.2 Environment menu --> | ||
| + | <!--=====================================================--> | ||
| + | <h3><p style="text-align:center; color: #fe5656;font-size: 40px">2.7.2 Environment menu</p></h3> | ||
| + | <p>The list of available environments presets is variable and build from the <span style="color: #ffdd33">maskenv</span> notecard and those that are manually added from the <span style="color: #ffdd33">add</span> menu.</p> | ||
| + | <gallery mode="slideshow"> | ||
| + | File:HG menu view env1.png|page 1/5 | ||
| + | File:HG menu view env2.png|page 2/5 | ||
| + | File:HG menu view env3.png|page 3/5 | ||
| + | File:HG menu view env4.png|page 4/5 | ||
| + | File:HG menu view env5.png|page 5/5 | ||
| + | </gallery> | ||
| + | [[File:Warning64.png|frameless|left]] If your <span style="color: #ffdd33">settings</span> folder is not populated with environnement settings, the final result may differ depending on the viewer you are using! Best copy all the sets from your Librairy\Environnements\Skies\ to your Inventory\settings\.<br><br><br> | ||
| + | <p><span style="color: #00ff00">⇫ BACK ⇫</span> – Move back to the previous menu.<br> | ||
| + | <span style="color: #00ff00">⍰ HELP ⍰</span> – Streams the help into the chat window.<br> | ||
| + | <span style="color: #00ff00">add</span> - Add a custom environnement setting to the set, format is name (8 chars max) no space no punctuation. In case of EEP be sure the setting is present in the user inventory, see folder 'settings'.<br> | ||
| + | <span style="color: #00ff00">delete</span> - Remove a custom environment setting from the list if they are.<br> | ||
| + | <span style="color: #00ff00">none ✔</span> - No environnement preset active.<br> | ||
| + | <span style="color: #00ff00">default, Neutral, Midnight, Sunrise, A-3AM, A-6AM, A-9AM, Midday, A-3PM, A-6PM, A-9PM, Night,80's Wave, Barcelona, Blizzard, Blue Midday, Bristol, CalWL, Coastal Afternoon, Coastal Sunset, Desert Sunset, Dusty, Fine Day, foggy, Funky Funky Funky, gelatto,Ghost, PaperSnow, Pinkpurple, Pirate, Purple, Purplebluenight, Verdigris, ShadowSet</span> - The user is unable to change the viewer environment settings and is forced to one of the listed. Preset can be EEP settings if the user folders are previously setup.<br> | ||
| + | <br><hr> | ||
| + | <p>Examples of environment settings.</p> | ||
| + | <gallery mode="slideshow"> | ||
| + | File:Hg env default.png|default | ||
| + | File:Hg env neutral.png|Neutral | ||
| + | File:Hg env midnight.png|Midnight | ||
| + | File:Hg env sunrise.png|Sunrise | ||
| + | File:Hg env A3AM.png|A-3AM | ||
| + | File:Hg env A6AM.png|A-6AM | ||
| + | File:Hg env A9AM.png|A-9AM | ||
| + | File:Hg env midday.png|Midday | ||
| + | File:Hg env A3PM.png|A-3PM | ||
| + | File:Hg env A6PM.png|A-6PM | ||
| + | File:Hg env A9PM.png|A-9PM | ||
| + | File:Hg env night.png|Night | ||
| + | File:Hg env 80's wave.png|80's Wave | ||
| + | File:Hg env barcelona.png|Barcelona | ||
| + | File:Hg env blizzard.png|Blizzard | ||
| + | File:Hg env blue midday.png|Blue Midday | ||
| + | File:Hg env bristol.png|Bristol | ||
| + | File:Hg env calwl.png|CalWL | ||
| + | File:Hg env costal afternoon.png|Coastal Afternoon | ||
| + | File:Hg env costal sunset.png|Coastal Sunset | ||
| + | File:Hg env desert sunset.png|Desert Sunset | ||
| + | File:Hg env dusty.png|Dusty | ||
| + | File:Hg env fine day.png|Fine Day | ||
| + | File:Hg env foggy.png|foggy | ||
| + | File:Hg env funky funky funky.png|Funky Funky Funky | ||
| + | File:Hg env gelatto.png|gelatto | ||
| + | File:Hg env ghost.png|Ghost | ||
| + | File:Hg env papersnow.png|PaperSnow | ||
| + | File:Hg env pinkpurple.png|Pinkpurple | ||
| + | File:Hg env pirate.png|Pirate | ||
| + | File:Hg env purple.png|Purple | ||
| + | File:Hg env purplebluenight.png|Purplebluenight | ||
| + | File:Hg env verdigris.png|Verdigris | ||
| + | File:Hg env shadowset.png|ShadowSet | ||
| + | </gallery> | ||
| + | <br><hr> | ||
| + | <!--=====================================================--> | ||
| + | <!--2.7.2.1 Add menu --> | ||
| + | <!--=====================================================--> | ||
| + | <h4><p style="text-align:center; color: #fe5656;font-size: 40px">2.7.2.1 Add menu</p></h4> | ||
| + | [[File:HG menu environment menu add.png|center]]<br> | ||
| + | <p>Example: <span style="color: #ffdd33">Bristol</span> for a dark environment setting.</p> | ||
| + | <br><hr> | ||
| + | <!--=====================================================--> | ||
| + | <!--2.7.2.2 Setup environment folder --> | ||
| + | <!--=====================================================--> | ||
| + | <h4><p style="text-align:center; color: #fe5656;font-size: 40px">2.7.2.2 Setup environment folder</p></h4> | ||
| + | <p>How to correctly setup your inventory from the environment library.</p> | ||
| + | [[File:HG environment settup 1024.png|center]]<br> | ||
| + | <br><hr> | ||
| + | <!--=====================================================--> | ||
| + | <!--2.8 Vision menu --> | ||
| + | <!--=====================================================--> | ||
| + | <h2><p style="text-align:center; color: #fe5656;font-size: 40px">2.8 Vision menu</p></h2> | ||
| + | <p>From this menu you can apply some vision restrictions.</p> | ||
| + | [[File:HG menu vision.png|center]]<br> | ||
| + | <p><span style="color: #00ff00">⇫ BACK ⇫</span> – Move back to the previous menu.<br> | ||
| + | <span style="color: #00ff00">⍰ HELP ⍰</span> – Streams the help into the chat window.<br> | ||
| + | <span style="color: #00ff00">⏏ EXIT ⏏</span> – Close the actual menu and release the menu access to anyone.<br> | ||
| + | <span style="color: #00ff00">ML ✔</span> - Mouselook is enabled and the user's camera is forced to the first-view.<br> | ||
| + | <span style="color: #00ff00">lock ✔</span> - prevents the user from unlocking the camera from the avatar, meaning that the user cannot use Alt to focus nor orbit the camera around the avatar. While the camera is locked, the sim forces it to stay in a line of sight from the avatar.<br> | ||
| + | <span style="color: #00ff00">limit ✘</span> - no camera limit range is active, click for options.<br> | ||
| + | <span style="color: #00ff00">limit ✔</span> - a camera limit range is active, click for options.<br> | ||
| + | <span style="color: #00ff00">focus ✘</span> - no focus target active, click for options.<br> | ||
| + | <span style="color: #00ff00">focus ✔</span> - a focus target is active, click for options.<br> | ||
| + | <span style="color: #00ff00">clear ✔</span> - all restrictions are cleared and reseted to defaults values.<br></p> | ||
| + | <br><hr> | ||
| + | <!--=====================================================--> | ||
| + | <!--2.8.1 Limit menu --> | ||
| + | <!--=====================================================--> | ||
| + | <h3><p style="text-align:center; color: #fe5656;font-size: 40px">2.8.1 Limit menu</p></h3> | ||
| + | <p>You can enable a <span style="color: #ffdd33">limit</span> restriction to the user to not move the camera outside a range.</p> | ||
| + | [[File:HG menu vision limit.png|center]]<br> | ||
| + | <p><span style="color: #00ff00">⇫ BACK ⇫</span> – Move back to the previous menu.<br> | ||
| + | <span style="color: #00ff00">⍰ HELP ⍰</span> – Streams the help into the chat window.<br> | ||
| + | <span style="color: #00ff00">limit ✔</span> - prevents the user from moving the camera outside the defined range from the avatar, either with the mouse wheel or when focusing with the Alt key.<br> | ||
| + | <span style="color: #00ff00">+1m, +2m, +5m, +10m</span> – increase the camera limit range of the selected value, maximum is 96m.<br> | ||
| + | <span style="color: #00ff00">-1m, -2m, -5m, -10m</span> – decrease the camera limit range of the selected value, minimum is 1m.<br> | ||
| + | <span style="color: #00ff00">default</span> – set the camera limit range to the default value of 3m.<br></p> | ||
| + | <br><hr> | ||
| + | <!--=====================================================--> | ||
| + | <!--2.8.2 Focus menu --> | ||
| + | <!--=====================================================--> | ||
| + | <h3><p style="text-align:center; color: #fe5656;font-size: 40px">2.8.2 Focus menu</p></h3> | ||
| + | <gallery mode="slideshow"> | ||
| + | Image:HG menu vision focus1.png|page 1/2 | ||
| + | Image:HG menu vision focus2.png|page 2/2 | ||
| + | </gallery> | ||
| + | <p><span style="color: #00ff00">⇫ BACK ⇫</span> – Move back to the previous menu.<br> | ||
| + | <span style="color: #00ff00">⇦ PREVIOUS</span> - Move back to the previous page.<br> | ||
| + | <span style="color: #00ff00">NEXT ⇨</span> - Move forward to the next page.<br> | ||
| + | <span style="color: #00ff00">focus ✔</span> - If the keyholder is present and inside the defined focus range, the user is forced to turn toward the keyholder and the camera will focus one of the selected <span style="color: #ffdd33">target</span>, the height of the camera can be forced with <span style="color: #ffdd33">myEyes</span>. If the user sit on an object, or the keyholder is off sim, or if the keyholder is outside the focus range, the focus is replaced by camera limit of 3.0m. Be aware that ML is not allowed, if the user decide to roll into ML position an RLV command will be triggered to force to leave ML. In case ML setting is ✔ the user will be toggled from ML to forced camera and vice versa to keep the feeling of the special experience.<br> | ||
| + | <span style="color: #00ff00">+1m, +2m, +5m, +10m</span> - increase the keyholder detection range within the user is forced to focus toward the keyholder, maximum is 96m.<br> | ||
| + | <span style="color: #00ff00">-1m, -2m, -5m, -10m</span> - decrease the keyholder detection range within the user is forced to focus toward the keyholder, minimum is 1m.<br> | ||
| + | <span style="color: #00ff00">default</span> - set the focus range to the default value of 20m.<br> | ||
| + | <span style="color: #00ff00">myEyes ⇧,⇨,⇩</span> - Select the height of the user's camera, where the user is looking from (head, half height, feet) when focus is active.<br> | ||
| + | <span style="color: #00ff00">target ⇧,⇨,⇩</span> - Select the height of the user's camera target, where the user is looking at (head, butt height, feet) when focus is active.<br> | ||
| + | <span style="color: #00ff00">show ✔</span> - If the parcel allows to rez, this function shows inworld the position of the user's camera and where he is looking at. You can use it to adjust the positions of the position where the user is looking from and the position where the user is forced to look at. Disabled if the keyholder vanish or the user sit on an obkect.<br></p> | ||
| + | <br><hr> | ||
| + | <p>Example of the <span style="color: #ffdd33">show</span> feature.</p> | ||
| + | [[File:HG focus show.png|center]]<br> | ||
| + | <p>In the example here, the user is forced to look at the feet of the keyholder. Name with 🎯 is the looking at and name with <span style="color: #ffdd33">👁</span> is the looking from.</p> | ||
| + | <br><hr> | ||
| + | <!--=====================================================--> | ||
| + | <!--2.9 Style menu --> | ||
| + | <!--=====================================================--> | ||
| + | <h2><p style="text-align:center; color: #fe5656;font-size: 40px">2.9 Style menu</p></h2> | ||
| + | <p>Texture & color setup is only done over the style menu by both user and keyholder. The Harness Gag can have a leather look or plastic look, for leather you have different sets of textures for the differents colors, for plastic you have only one texture set for the white color and you can colorize it using the color menu. You can also show or hide harness accessories.</p> | ||
| + | [[File:HG menu style.png|center]]<br> | ||
| + | <p><span style="color: #00ff00">⍰ HELP ⍰</span> – Streams the help into the chat window.<br> | ||
| + | <span style="color: #00ff00">⇫ BACK ⇫</span> – Move back to the previous menu.<br> | ||
| + | <span style="color: #00ff00">⏏ EXIT ⏏</span> – Close the actual menu and release the menu access to anyone.<br> | ||
| + | <span style="color: #00ff00">option</span> - Adjust the Harness Gag options.<br> | ||
| + | <span style="color: #00ff00">preset</span> - Select a full preset for the entire harness gag.<br> | ||
| + | <span style="color: #00ff00">select</span> - Adjust individuals prims to the wished looking.<br> | ||
| + | <span style="color: #00ff00">logo</span> - Select the logo to show on the tag.<br> | ||
| + | <span style="color: #00ff00">visible</span> - Show/hide the harness gag accessories.<br></p> | ||
| + | <br><hr> | ||
| + | <!--=====================================================--> | ||
| + | <!--2.9.1 Option menu --> | ||
| + | <!--=====================================================--> | ||
| + | <h3><p style="text-align:center; color: #fe5656;font-size: 40px">2.9.1 Option menu</p></h3> | ||
| + | [[File:HG menu style option3.png|center]]<br> | ||
| + | <p><span style="color: #00ff00">⍰ HELP ⍰</span> – Streams the help into the chat window.<br> | ||
| + | <span style="color: #00ff00">⇫ BACK ⇫</span> – Move back to the previous menu.<br> | ||
| + | <span style="color: #00ff00">G.ring</span> - You can either use a <span style="color: #ffdd33">simple</span> ring gag with one prim (easier to adjust) or a <span style="color: #ffdd33">complex</span> with three prims (for the picky one!). User can also makes the complex gag's straps symmetric.<br> | ||
| + | <span style="color: #00ff00">G.strap</span> - Toggle the ball gag & holed gag strap from rubber to fabric and vice versa.<br> | ||
| + | <span style="color: #00ff00">no.Mesh ✔</span> - Enable the open mouth animation for the SL system head.<br> | ||
| + | <br><hr> | ||
| + | <!--=====================================================--> | ||
| + | <!--2.9.2 Preset menu --> | ||
| + | <!--=====================================================--> | ||
| + | <h3><p style="text-align:center; color: #fe5656;font-size: 40px">2.9.2 Preset menu</p></h3> | ||
| + | [[File:HG menu style preset.png|center]]<br> | ||
| + | <p><span style="color: #00ff00">⇫ BACK ⇫</span> – Move back to the previous menu.<br> | ||
| + | <span style="color: #00ff00">L.grey, L.beige, L.white, L.blue, L.brown, L.blue, L.pink, L.red, L.yellow</span> - Select one of the leather preset.<br> | ||
| + | <span style="color: #00ff00">Plastic</span> - Select the plastic preset.<br> | ||
| + | <p style="color: #ffdd33">NOTE: for leather texture the color is included in the texture and for the plastic texture you only have a white preset, coloring has to be done over the color menu.</p> | ||
| + | <br><hr> | ||
| + | <!--=====================================================--> | ||
| + | <!--2.9.3 Select menu --> | ||
| + | <!--=====================================================--> | ||
| + | <h3><p style="text-align:center; color: #fe5656;font-size: 40px">2.9.3 Select menu</p></h3> | ||
| + | <p>If you want to texture or color a part of the harness gag you can do it by selecting the part you want to alter and than select what do you want to change.</p> | ||
| + | <gallery mode="slideshow"> | ||
| + | Image:HG menu style select1.png|page 1/2 | ||
| + | Image:HG menu style select2.png|page 2/2 | ||
| + | </gallery> | ||
| + | <p><span style="color: #00ff00">⇫ BACK ⇫</span> – Move back to the previous menu.<br> | ||
| + | <span style="color: #00ff00">⇦ PREVIOUS</span> - Move back to the previous page.<br> | ||
| + | <span style="color: #00ff00">NEXT ⇨</span> - Move forward to the next page.<br> | ||
| + | <span style="color: #00ff00">ball, bit, blinder, lashes, cock, cockBase, ear, fab in, fab out, fab trim, holed, lock, metal, ringCoat, strap, tag</span> - Select the part to alter.<br></p> | ||
| + | <p>When the part you want to alter is selected another menu will ask you what to do.</p> | ||
| + | [[File:HG menu style select action.png|center]]<br> | ||
| + | <p><span style="color: #00ff00">⇫ BACK ⇫</span> – Move back to the previous menu.<br> | ||
| + | <span style="color: #00ff00">color</span> - Submenu to change the color.<br> | ||
| + | <span style="color: #00ff00">material</span> - Submenu to change the material.<br> | ||
| + | <span style="color: #00ff00">shine</span> - Submenu to change the shine.<br></p> | ||
| + | <p>You can change the color, material or shine. Remember the leathers textures include the color and the it is not recommend to recolor them, the final look will not be optimal!.</p> | ||
| + | <br><hr> | ||
| + | <!--=====================================================--> | ||
| + | <!--2.9.3.1 Color menu --> | ||
| + | <!--=====================================================--> | ||
| + | <h4><p style="text-align:center; color: #fe5656;font-size: 40px">2.9.3.1 Color menu</p></h4> | ||
| + | <p>Select the color you want to apply on the selected part, you can also change the custom A & B color to your liking.</p> | ||
| + | <gallery mode="slideshow"> | ||
| + | Image:HG menu style select action color1.png|page 1/4 | ||
| + | Image:HG menu style select action color2.png|page 2/4 | ||
| + | Image:HG menu style select action color3.png|page 3/4 | ||
| + | Image:HG menu style select action color4.png|page 4/4 | ||
| + | </gallery> | ||
| + | <p><span style="color: #00ff00">⇫ BACK ⇫</span> – Move back to the previous menu.<br> | ||
| + | <span style="color: #00ff00">⇦ PREVIOUS</span> - Move back to the previous page.<br> | ||
| + | <span style="color: #00ff00">NEXT ⇨</span> - Move forward to the next page.<br> | ||
| + | <span style="color: #00ff00">⍰ HELP ⍰</span> – Streams the help into the chat window.<br> | ||
| + | <span style="color: #00ff00">D.green, F.pink, L.red, L,yellow, P.pink, amethyst, azure, black, blood, blue, copper, custom.A, custom.B, gold, indigo,lime, metal, navy, orange, plum, purple, red, silver, slate, steel, white, yellow</span> – Select the color preset for the mask.<br> | ||
| + | <span style="color: #00ff00">RGB.A, RGB.B</span> – Enter the new value for custom.A or custom.B color. Example <123/123/123><br></p> | ||
| + | <br><hr> | ||
| + | <!--=====================================================--> | ||
| + | <!--2.9.3.2 Material menu --> | ||
| + | <!--=====================================================--> | ||
| + | <h4><p style="text-align:center; color: #fe5656;font-size: 40px">2.9.3.2 Material menu</p></h4> | ||
| + | [[File:HG menu style select action material.png|center]]<br> | ||
| + | <p><span style="color: #00ff00">⇫ BACK ⇫</span> – Move back to the previous menu.<br> | ||
| + | <span style="color: #00ff00">L.grey, L.beige, L.white, L.blue, L.brown, L.blue, L.pink, L.red, L.yellow</span> - Select one of the leather material.<br> | ||
| + | <span style="color: #00ff00">Plastic</span> - Select the plastic material.<br></p> | ||
| + | <br><hr> | ||
| + | <!--=====================================================--> | ||
| + | <!--2.9.3.3 Shine menu --> | ||
| + | <!--=====================================================--> | ||
| + | <h4><p style="text-align:center; color: #fe5656;font-size: 40px">2.9.3.3 Shine menu</p></h4> | ||
| + | <gallery mode="slideshow"> | ||
| + | Image:HG menu style select action shine1.png|page 1/2 | ||
| + | Image:HG menu style select action shine2.png|page 2/2 | ||
| + | </gallery> | ||
| + | <p><span style="color: #00ff00">⇫ BACK ⇫</span> – Move back to the previous menu.<br> | ||
| + | <span style="color: #00ff00">⇦ PREVIOUS</span> - Move back to the previous page.<br> | ||
| + | <span style="color: #00ff00">NEXT ⇨</span> - Move forward to the next page.<br> | ||
| + | <span style="color: #00ff00">⍰ HELP ⍰</span> – Streams the help into the chat window.<br> | ||
| + | <span style="color: #00ff00">-1g</span> – Reduce the glossiness by 1.<br> | ||
| + | <span style="color: #00ff00">-10g</span> – Reduce the glossiness by 10.<br> | ||
| + | <span style="color: #00ff00">-100g</span> – Reduce the glossiness by 100.<br> | ||
| + | <span style="color: #00ff00">+1g</span> – Increase the glossiness by 1.<br> | ||
| + | <span style="color: #00ff00">+10g</span> – Increase the glossiness by 10.<br> | ||
| + | <span style="color: #00ff00">+100g</span> – Increase the glossiness by 100.<br> | ||
| + | <span style="color: #00ff00">-1e</span> – Reduce the environment by 1.<br> | ||
| + | <span style="color: #00ff00">-10e</span> – Reduce the environment by 10.<br> | ||
| + | <span style="color: #00ff00">-100e</span> – Reduce the environment by 100.<br> | ||
| + | <span style="color: #00ff00">+1e</span> – Increase the environment by 1.<br> | ||
| + | <span style="color: #00ff00">+10e</span> – Increase the environment by 10.<br> | ||
| + | <span style="color: #00ff00">+100e</span> – Increase the environment by 100.<br></p> | ||
| + | <p>The materials textures already include the glossiness and environment values, but you can change the to your liking.</p> | ||
| + | <br><hr> | ||
| + | <!--=====================================================--> | ||
| + | <!--2.9.4 Visible menu --> | ||
| + | <!--=====================================================--> | ||
| + | <h3><p style="text-align:center; color: #fe5656;font-size: 40px">2.9.4 Visible menu</p></h3> | ||
| + | <p>You can select the harness gag accessories to be shown or hiden.</p> | ||
| + | [[File:HG menu style visible.png|center]]<br> | ||
| + | <p><span style="color: #00ff00">⇫ BACK ⇫</span> – Move back to the previous menu.<br> | ||
| + | <span style="color: #00ff00">tag</span> - Show/hide the tag.<br> | ||
| + | <span style="color: #00ff00">lashes</span> - Show/hide the lashes.<br> | ||
| + | <span style="color: #00ff00">ear</span> - Show/hide the ears.<br> | ||
| + | <span style="color: #00ff00">blind</span> - Show/hide the blinders.<br></p> | ||
| + | <br><hr> | ||
| + | <p>You can select up to 4 accessories to be shown or not.</p> | ||
| + | <gallery mode="slideshow"> | ||
| + | Image:HG style accessories none.png|none | ||
| + | Image:HG style accessories tag.png|tag | ||
| + | Image:HG style accessories lashes.png|lashes | ||
| + | Image:HG style accessories ears.png|ears | ||
| + | Image:HG style accessories blinders.png|blinders | ||
| + | Image:HG style accessories all.png|all | ||
| + | </gallery> | ||
| + | <br><hr> | ||
| + | <p>You can select the logo to be shown on the tag if that last one is visible. The list of logos textures is build from the <span style="color: #ffdd33">logo</span> notecard and the one that are manually added using the add menu. You can also download the UV file to make your own logo.</p> | ||
| + | <gallery mode="slideshow"> | ||
| + | Image:HG style logo.png|page 1/3 | ||
| + | Image:HG style logo1.png|page 2/3 | ||
| + | Image:HG style logo2.png|page 3/3 | ||
| + | </gallery> | ||
| + | <p><span style="color: #00ff00">⇫ BACK ⇫</span> – Move back to the previous menu.<br> | ||
| + | <span style="color: #00ff00">⇦ PREVIOUS</span> - Move back to the previous page.<br> | ||
| + | <span style="color: #00ff00">NEXT ⇨</span> - Move forward to the next page.<br> | ||
| + | <span style="color: #00ff00">⍰ HELP ⍰</span> – Streams the help into the chat window.<br> | ||
| + | <span style="color: #00ff00">add</span> - Add a custom logo to the list. Format is <span style="color: #ffdd33"><UUID of the texture>,<unique name></span>.<br> | ||
| + | <span style="color: #00ff00">delete</span> - Delete a custom logo from the list if they are.<br> | ||
| + | <span style="color: #00ff00">get UV</span> - Get the UV map to make your own logo.<br> | ||
| + | <span style="color: #00ff00">none</span> - Hide the actual logo.<br> | ||
| + | <span style="color: #00ff00">CMFS, PFS, bee, bunny, cow, k.lock, mare, p.girl, pig, ponizei, puppy, slave, slut</span> - Select the logo to be shown on the tag if visible.<br></p> | ||
| + | <br><hr> | ||
| + | <p>Example of the tag's logos</p> | ||
| + | <gallery mode="slideshow"> | ||
| + | Image:HG tag logo PFS.png|PFS | ||
| + | Image:HG tag logo CMFS.png|CMFS | ||
| + | Image:HG tag logo bee.png|Bee | ||
| + | Image:HG tag logo bunny.png|Bunny | ||
| + | Image:HG tag logo cow.png|Cow | ||
| + | Image:HG tag logo keep locked.png|Keep locked | ||
| + | Image:HG tag logo mare.png|Mare | ||
| + | Image:HG tag logo neko.png|Neko | ||
| + | Image:HG tag logo owned.png|Owned | ||
| + | Image:HG tag logo ponyboy.png|Ponyboy | ||
| + | Image:HG tag logo ponygirl.png|Ponygirl | ||
| + | Image:HG tag logo pig.png|Pig | ||
| + | Image:HG tag logo puppy.png|Puppy | ||
| + | Image:HG tag logo slave.png|Slave | ||
| + | Image:HG tag logo slut.png|Slut | ||
| + | </gallery> | ||
| + | <br><hr> | ||
| + | <!--=====================================================--> | ||
| + | <!--3. Resize it --> | ||
| + | <!--=====================================================--> | ||
| + | <h1><p style="text-align:center; color: #fe5656;font-size: 60px">3. Resize it</p></h1> | ||
| + | <p>The harness gag is not rigged and you have to adjust it to your head by yourself, If you are not used to it you can find many manu tutorials on Youtube but here you will find an example of to resize the gag.</p> | ||
| + | <gallery mode="slideshow"> | ||
| + | Image:HG resize step1.png|Step 1: Right click the harness gag and get the <span style="color: #ffdd33">Edit</span> option. | ||
| + | Image:HG resize step2.png|Step 2: The Edit menu should open to gives you several tools to edit it. | ||
| + | Image:HG resize step3.png|Step 3: Select the checkbox <span style="color: #ffdd33">Edit linked</span>. | ||
| + | Image:HG resize step4.png|Step 4: Play with the arrows until the gag ball is selected. | ||
| + | Image:HG resize step5.png|Step 4: Play with the arrows until the gag ball is selected. | ||
| + | Image:HG resize step6.png|Step 5: A gag ball is supposed to be symetric and placed in the middle of the mouth. For that purpose make sure the checkbox <span style="color: #ffdd33">Stretch Both Sides</span> is checked. For some straps you may need to uncheck this to have a better fitting. | ||
| + | Image:HG resize step7.png|Step 6: Now press and keep pressed the <span style="color: #ffdd33">CTRL</span> and <span style="color: #ffdd33">SHIFT</span> keys while grabbing the corner and move it. You can move also the ball w/o those keys pressed and grab directly the colored arrows. | ||
| + | Image:HG resize step8.png|Step 7: If happy you can either close the edit window or scroll to the next prim to adjust. | ||
| + | </gallery> | ||
| + | <br><hr> | ||
| + | <!--=====================================================--> | ||
| + | <!--4. Options --> | ||
| + | <!--=====================================================--> | ||
| + | <h1><p style="text-align:center; color: #fe5656;font-size: 60px">4. Options</p></h1> | ||
| + | <!--=====================================================--> | ||
| + | <!--4.1 Access plugins --> | ||
| + | <!--=====================================================--> | ||
| + | <h2><p style="text-align:center; color: #fe5656;font-size: 40px">4.1 Access plugins</p></h2> | ||
| + | <p>You can add access script (public or for PFS staff), for this you have to rez the box '[PFS] Harness gag addons v1 (REZ me)' on the floor and unpack it into your inventory. Than rez the Harness gag on the floor too and drag & drop from your inventory into the content tab of the harness gag the access script you want to add. You can add both to have public and PFS access.</p> | ||
| + | [[File:HG drag drop addons2.png|center]]<br> | ||
| + | <br><hr> | ||
| + | <!--=====================================================--> | ||
| + | <!--4.2 Smart leash holder --> | ||
| + | <!--=====================================================--> | ||
| + | <h2><p style="text-align:center; color: #fe5656;font-size: 40px">4.2 Smart leash holder</p></h2> | ||
| + | <p>You can use any leash holder to leash the harness gag as long the name contains one of the word: <span style="color: #ffdd33">holder</span>, <span style="color: #ffdd33">handle</span> or <span style="color: #ffdd33">leash</span>. You can also use the integrated <span style="color: #ffdd33">smart leash holder</span> (you can get it from the leash menu) and have additionnal feature like follow TP and easy force TP from anywhere.</p> | ||
| + | [[File:HG leash holder.png|center|[PFS] smart leash holder]]<br> | ||
| + | <p>The smart leash holder automatically register and unregister the leash you grab, release or get released by timeout. For more details and options you can touch it to get a menu.</p> | ||
| + | [[File:HG leash menu.png|center]]<br> | ||
| + | <p><span style="color: #00ff00">exit</span> – Close the menu.<br> | ||
| + | <span style="color: #00ff00">auto TP [✔]</span> - Auto TP is enable and leash anyone listed above if the distance is greatter than 2 times the leash length.<br> | ||
| + | <span style="color: #00ff00">auto TP [✘]</span> - Auto TP is disabled but you can still force TP using the shortcuts (see get tools).<br> | ||
| + | <span style="color: #00ff00">verbose [✔]</span> - The smart leash holder becomes very chatty, mainyl for debug purpose.<br> | ||
| + | <span style="color: #00ff00">verbose [✘]</span> - The smart leash holder spams you as less than possible.<br> | ||
| + | <span style="color: #00ff00">send TP</span> - Send a force TP to anyone listed above.<br> | ||
| + | <span style="color: #00ff00">get tools</span> - Offers you a set of gestures to have keyboard shortcuts for menu & force TP.<br> | ||
| + | [[File:HG leash gestures.png|center|[PFS] smart leash tools]]<br> | ||
| + | <p>The smart leash holder is the best tool to keep your favorite pet close to you in any conditions!.</p> | ||
| + | [[File:HG leash example.png|center]]<br> | ||
| + | <br><hr> | ||
| + | <!--=====================================================--> | ||
| + | <!--4.3 Truekey --> | ||
| + | <!--=====================================================--> | ||
| + | <h2><p style="text-align:center; color: #fe5656;font-size: 40px">4.3 Truekey</p></h2> | ||
| + | <p>If you get in big troubles, you have no access plugins, the only way to get free without cheating out is to use a Truekey you previously have setted up before to get locked. Truekey works with a password and it can't be changed or read when the harness gag is locked. The Truekey password is also resetted to a random value at any full reset. You cannot use the Truekey on yourself but you can ask anyone to use it as long the person knows the password!</p> | ||
| + | [[File:HG truekey2.png|center|[PFS] Truekey]]<br> | ||
| + | [[File:Warning64.png|frameless|left]] To get the Truekey menu the user have to <span style="color: #ffdd33">ckic it longer than 2s!</span> You can also get it by command line <span style="color: #ffdd33">/7nitruekey</span> if your username starts with <span style="color: #ffdd33">ni</span>.</p> | ||
| + | <br><hr> | ||
| + | <!--=====================================================--> | ||
| + | <!--4.3.1 Setup a new Truekey --> | ||
| + | <!--=====================================================--> | ||
| + | <h3><p style="text-align:center; color: #fe5656;font-size: 40px">4.3.1 Setup a new Truekey</p></h3> | ||
| + | <p>The user has to setup the Truekey before to use it, functions available from the harness gag tools menu while unlocked and key back.</p> | ||
| + | [[File:HG Truekey setup menu.png|center]]<br> | ||
| + | <p>The user can here see the actual Truekey password and change it with <span style="color: #ffdd33">set pw</span>. User can also get a new Truekey with <span style="color: #ffdd33">Truekay</span> and than can give it away. Keep in mind the Truekey is reseted on transfert and you have to give both the Truekey and password to the person to be able to use it the day you need it. There is no way to get the actual password or change it when the harness gag is locked!</p> | ||
| + | <br><hr> | ||
| + | <!--=====================================================--> | ||
| + | <!--4.3.2 Add password to Truekey --> | ||
| + | <!--=====================================================--> | ||
| + | <h3><p style="text-align:center; color: #fe5656;font-size: 40px">4.3.2 Add password to Truekey</p></h3> | ||
| + | <p>A Truekey can keep in memory more than one password, the limit is the free memory available to store more. The next user of the Truekey have to adds the harness gag users's password to be able to use it.</p> | ||
| + | [[File:HG Truekey add menu.png|center]]<br> | ||
| + | <p>Click <span style="color: #ffdd33">add pw</span> to add a new password to the list. Here in our example the password <span style="color: #ffdd33">564641</span> has been saved. You can also remove password with <span style="color: #ffdd33">remp pw</span> or reset the Truekey to its initial state with <span style="color: #ffdd33">reset</span>.</p> | ||
| + | <br><hr> | ||
| + | <!--=====================================================--> | ||
| + | <!--4.3.3 Use a Truekey --> | ||
| + | <!--=====================================================--> | ||
| + | <h3><p style="text-align:center; color: #fe5656;font-size: 40px">4.3.3 Use a Truekey</p></h3> | ||
| + | <p>To use a Truekey to unlock the harness gag you have first to access the harness gag user's tools menu.</p> | ||
| + | [[File:HG Truekey use menu.png|center]]<br> | ||
| + | <p>As you can see in the example above here you cannot see the Truekey password but you can <span style="color: #ffdd33">use key</span>. Click first <span style="color: #ffdd33">use key</span> and than <span style="color: #ffdd33">simple touch your Truekkey you are are already wearing and has been already configured</span> (see above if not).</p> | ||
| + | <p>If you success you should get in the chat window <span style="color: #ffdd33">[TrueKey] key grabbed</span> and the harness gag user's main menu should pop!</p> | ||
| + | <br><hr> | ||
| + | <!--=====================================================--> | ||
| + | <!--5. Fix your cheeks --> | ||
| + | <!--=====================================================--> | ||
| + | <h1><p style="text-align:center; color: #fe5656;font-size: 60px">5. Fix your cheeks</p></h1> | ||
| + | <p>With some shapes you may have a collision between the harness gag and your cheeks. Since the harness gag isn't rigged you have to adjust your shape.</p> | ||
| + | [[File:HG collision.png|center]]<br> | ||
| + | <p>To edit your shape move your mouse over your tag, right click your mouse button.</p> | ||
| + | [[File:HG menu appearance.png|center]]<br> | ||
| + | <p>Select <span style="color: #ffdd33">appearance</span> and click it with the left mouse button.</p> | ||
| + | [[File:HG menu edit shape.png|center]]<br> | ||
| + | <p>From the tab <span style="color: #ffdd33">head</span> you can shift the <span style="color: #ffdd33">Upper Cheeks</span> cursor to adjust it under the strap.</p> | ||
| + | [[File:HG menu mod and save.png|center]]<br> | ||
| + | <p>When you are done don't forget to click <span style="color: #ffdd33">save</span> to save it to the actual shape or a new one with new name. During the editing, if you are not happy of the result, you can click <span style="color: #ffdd33">Undo Changes</span> and you will get back all your actual shape settings.</p> | ||
| + | <br><hr> | ||
| + | <!--=====================================================--> | ||
| + | <!--6. Update your adjusted one --> | ||
| + | <!--=====================================================--> | ||
| + | <h1><p style="text-align:center; color: #fe5656;font-size: 60px">6. Update your adjusted one</p></h1> | ||
| + | <p>Auto update with a script would turn the harness gag into a no copy object and we don't want that. To help you to update your actual harness gag that you spent lots of time to adjust I will show you how to keep it as it is and update it.</p> | ||
| + | <p>Rez side by side both harness gags on the floor.</p> | ||
| + | <gallery mode="slideshow"> | ||
| + | Image:HG update 1b.png|1. Copy everything from the new content into the temp folder | ||
| + | Image:HG update 2.png|2. All the content should be present in your temp folder | ||
| + | Image:HG update 3.png|3. Delete everything in the actual harness gag content (yes do it!!!) | ||
| + | Image:HG update 4.png|4. Your actuel harness gag's content should be empty | ||
| + | Image:HG update 5.png|5. copy everything from the temp folder into the actual harness gag's content | ||
| + | Image:HG update 6.png|6. All the temp folder should be present in your actual harness gag's content | ||
| + | Image:HG update 7.png|7. Update the object name with the new version number | ||
| + | Image:HG update 8.png|8. launch a Reset Link Set Data (RLSD) from the menu main/tools | ||
| + | Image:HG update 9.png|9. You are done, grab your actual one, delete the new one and the temp folder | ||
| + | </gallery> | ||
Latest revision as of 07:23, 26 June 2023
Contents
- 1 [PFS] Harness gag v1.1
- 2 1. Generalities
- 3 2. Harness gag features
- 4 3. Resize it
- 5 4. Options
- 6 5. Fix your cheeks
- 7 6. Update your adjusted one

[PFS] Harness gag v1.1
The [PFS] Harness gag is a bondage gear (not rigged and compatible to any head) to restrict your talk and view, mostly dedicated to ponyplay, it can be used in many other disciplines, you will be able to:
- lock/unlock with RLV or RLVa
- restrict your ability to talk with 5 gag levels plus full silenced
- use 5 gag types (ball, bit, cock, holed ball & ring)
- switch simple ring gag to complex ring gag for the best adjustment
- leash with auto turn and auto TP to leash holder
- apply view masks following style and color of the harness gag
- apply vision restrictions like ML, cam lilit or focus your keyholder body
- show/hide accessories (ears, blinders, tag or lashes)
- use RL/SL timer
- colorize & texture over menu, accessible by both user and keyholder
- work with RLV & RLVa, auto switch when locked
- make and add your own tag logo with integrated tag UV
- add your own mask texture
- add additionnal scripts for public, PFS access
- add your own access script (example is provided)
1. Generalities
This bondage gear is the result of the cooperation with Filly Heartsong who did the mesh design. We both put together our long experience in mesh design and scripting to provide you an unique gear. Because we care we are open to listen all your comments and suggestions, as long it will help to get a better product!
1.1 RLV
As a viewer standard, RLV restrictions are filtered to the object UUID and if your object uses same restrictions for several functions, you may run into trouble and the result may look a way different than expected. Thay's why RLV, here, is managed to the script level. You can have several scripts triggering restrictions w/o any interactions between them. You can easily follows the object restrictions table from the RLV menu.
Both RLV and RLVa are supported here but for some special features like screen overlay an addition attachement is required for RLV users. Even if most of us uses RLVa viewers today we still need to make things compatible to previous standards.
1.2 Access
The menu access is build in an inovative way. As standard, everyone can access the menu, with different access levels. Access levels are:
- public
- locker
- keyholder
- selftouch
Depending on the lock state of the object, you may get different access levels (they are cumulable) which allows you to do things or not. The not allowed functions are strikethrough but the positive side is you can still read every parameter and setting, including the user.
The menu is mono user but the keyholder has always the priority to access it.
You can access it using the command line over channel 7, just hit /7##gag to get access to the main menu of the object. Replace ## with the user 2 first letters of the user name.
The use of the API allows you to override the actual keyholder, this will help you to implement your own access list from wherever you want. You can implement "key grabbing" scripts as much you want they are asked one after the other. For more info look at the included public access script "plug.access.public".
1.3 Configurable
The object includes notecards to configure it, you can modify them at your own risk:
- logo: list of textures for the tag logo.
- maskenv: list of extra masks textures (if you want to add some more) and list of the EEP environment presets.
1.4 API
Objects you cannot mod are no fun, that's why you will find here an integrated API that will allows you make your own key grabbing script. plug.access.public is a script, full mod and documented, to make your own.
1.5 Integrated help
To make it accessible and easy to use, the object menus have a "help" feature to stream in your chat window some general informations regarding the actual menu displayed to help you to understand what does every buttons.
1.6 Truekey
The only way to unlock the object is the use of the key held by the keyholder. In case you are stuck or the keyholder not showing back you can, if seted up previously, use the Truekey feature to get unlocked by everyone having the key password. You can access it, set it up and use it fromt he "Tools" menu.
2. Harness gag features
The main menu provides you an access to all the functions. You can access it if you touch me or use the command line in the of 5m range. Command line is on channel 7 and is built with the 2 first letters of the username followed by the type of the gear: gag here... Example for 'nikki resident' gag you will type /7nigag (you will be noticed if the user has a customized prefix). You can also replace the prefix with '*' to get all users menus. Keyholder are not concerned by the distance limit but take in account the talk range limit.

⍰ HELP ⍰ – Streams the help into the chat window.
⏏ EXIT ⏏ – Close the actual menu and release the menu access to anyone. If not, the access menu will timeout after 300s of no use. Keyholder always have the priority to access the menu even if used by someone else. The actual menu user will be noticed for any attempt to access the menu (fail or success).
locked ✘ – This object is not locked, no RLV restrictions are applied.
locked ✔ – This object is locked; you cannot remove it and RLV restrictions are applied.
key ✘ – The key is not present and has been taken by someone.
key ✔ – The key is present, anyone can grab it.
tools – Sub-menu for the Truekey and some settings.
RLV – Sub-menu for RLV restrictions if they are.
timer – Sub-menu for timelock.
gag - Sub-menu for the gag function.
leash - Sub-menu for the leash function.
style - Sub-menu for the style of the gag.
view - Sub-menu for the view function.
vision - Sub-menu for the vision function.
When unlocking you get some options, you can either call the default settings back to put the harness gag to its initial state, or keep the settings as they are so the harness gag will take the last use settings

YES – All the settings except style are reseted to there default values.
NO – All the settings are left as they are, at the next lock all restrictions will be applied again.
MENU – Get the main menu back.
NOTE: timeout for this menu is shorter than the standard 300s, only 10s!.

⍰ HELP ⍰ – Streams the help into the chat window.
⇫ BACK ⇫ – Move back to the previous menu.
⏏ EXIT ⏏ – Close the actual menu and release the menu access to anyone.
Truekey – Only the wearer can get a new Truekey. The key can get given away, but the final user will need to know the password.
set pw – Set a new password number for the Truekey.
use key – When you wear the Truekey with the correct password you can grab this object key. The wearer cannot use the Truekey on its own object!
spam ✘ – no local chat spam about RLV version and the fact you own this awesome object.
spam ✔ – local chat spam for RLV version and the fact you own this awesome object.
prefix – change your prefix to whatever you want as long it's built with 2 letters.
RLSD – Reset the linkset data and restart all scripts, default material preset will be applied.
Universal scripts must deal with different configurations where sometimes same restrictions can be triggered by two scripts. That’s why here RLV restrictions are managed in a unique way. The goal is to keep things working as they should and especially when restrictions are lifted. All active restrictions are listed with the restriction itself like sendchat=n and the script which triggered it from sub.gag.headharness.

⍰ HELP ⍰ – Streams the help into the chat window.
⇫ BACK ⇫ – Move back to the previous menu.
⏏ EXIT ⏏ – Close the actual menu and release the menu access to anyone.
list - Stream in your chat window all the active restrictions with the script name which is the source of the restriction. You may see same restriction for different scripts, this is all normal.
Example of streamed out list of active restrictions:

NOTE: When the timer runs out, the key is given back to the user. No one will be able to grab it except if they are some "key grabbing" plugin scripts installed.
The timer can be RL or SL time, you can switch from one to another w/o resetting the time left. Wearer can set a timer and do some self-bondage, once started the timer cannot be stopped except if someone else grab the key and get the keyholder access level.


⇫ BACK ⇫ – Move back to the previous menu.
⇦ PREVIOUS - Move back to the previous page.
NEXT ⇨ - Move forward to the next page.
⍰ HELP ⍰ – Streams the help into the chat window.
stop - Stop the actual timer but don't give back the key back to the wearer.
RLtime ✘ – SL time mode.
RLtime ✔ – RL time mode.
hide ✔ – The actual timer value and any added time triggered by the menu buttons are hided to the wearer.
+2min – Add 2 minutes to the actual timer value.
+5min – Add 5 minutes to the actual timer value.
+30min – Add 30 minutes to the actual timer value.
+1h – Add 1 hour to the actual timer value.
+3h – Add 3 hours to the actual timer value.
+6h – Add 6 hours to the actual timer value.
+12h – Add 12 hours to the actual timer value.
+24h – Add 24 hours to the actual timer value.
NOTE: The restrictions are only active when the object is locked, and a gag type is applied.


⇫ BACK ⇫ – Move back to the previous menu.
⇦ PREVIOUS - Move back to the previous page.
NEXT ⇨ - Move forward to the next page.
⍰ HELP ⍰ – Streams the help into the chat window.
level ▂▃▅▇▉ – Gag level, from lightly gagged (▂) to heavy (▉).
ball, bit, cock, holed, ring ✔ – Select the gag type.
Safe ✔ – When safe the gag's channel changes every now and then to avoid cheat with gag's readers.
Rename – Set an alternative name for the gag talk and emotes.
emote ✘ ▂ ▆ ▉ – Capps the emotes length to the following levels:
- none [✘] – disabled.
- light [▂] – 40 chars/10 sec
- heavy [▆] – 20 chars/20 sec
- total [▉] – swallows all emote.
OCC ✔ – OCC (()) is allowed.
OCC ✘ – OCC (()) is restricted.
srt.IM ✘ – Start IM is allowed.
srt.IM ✔ – Start IM is restricted.
snd.IM ✘ – Send IM is allowed.
snd.IM ✔ – Send IM is restricted.
rec.IM ✘ – Receive IM is allowed.
rec.IM ✔ – Receive IM is restricted.
key.IM ✘ – no IM exception to keyholder.
key.IM ✔ – IM exception to keyholder.
clear ✔ – Reset all gag settings back to default values. ✔means the settings are on default values.
You can select up to 5 differents gags from the gag menu:
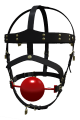
ball gag
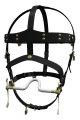
bit
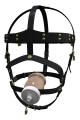
cock
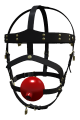
holed ball
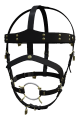
ring gag


Since the object is not rigged you can easily adjust the gags to your head by editing the object.
If you use the smart leash holder available from the [tools] menu you can make the wearer following you when leashed even through TP. As soon as the distance between the leash holder and the wearer is greater than 2 times the leash length a TP is send to the wearer. If the leash holder is not detected in the same region, a leash timeout is triggered after 300s and the wearer will be unleashed.

tools – Get the smart leash holder.
leash ✘ – Not leashed to anyone. Click me to grab the leash.
leash ✔ – A leash to person is active. Click me to unleash me.
length – Sub-menu to select the leash length.
post ✘ – Not leashed to any post. Click me to scan for nearby post.
post ✔ – A leash to post is active. Click me to unleash me.
passive, active – Switch the type of post you will scan for.
- Active - The scanned prim has some running scripts.
- Passive - The scanned prim has no script.
yank – Yank the leash to make the wearer moving up to you until the distance is less than 1m.
rope ✘ – Leash is a chain.
rope ✔ – Leash is a rope.

⍰ HELP ⍰ – Streams the help into the chat window.
⇫ BACK ⇫ – Move back to the previous menu.
⏏ EXIT ⏏ – Close the actual menu and release the menu access to anyone.
mask ✘ – The view is clear, and no mask (overlay) is applied on the display. Click me to enter the sub-menu.
mask ✔ – A mask (overlay) is applied on the display to restrict the view. Click me to enter the sub-menu.
env ✘ – The environment is not forced; the user can toggle daytime and environment settings. Click me to enter sub-menu.
env ✔ – The environment is forced; the user cannot toggle daytime and environment settings. Click me to enter sub-menu.
clear ✔ - Reset all mask & environment settings back to default values. ✔means the settings are on default values.
The list of available masks is variable and build from the maskenv notecard and those that are manually added from the add menu. In addition the auto setting will force the user to get a mask depending on the shown accessories, the strap in texture and the color.

⍰ HELP ⍰ – Streams the help into the chat window.
⇫ BACK ⇫ – Move back to the previous menu.
add – Add a custom mask to the list. Format is <texture_uuid>,<name>[,<color_name>]. Name length is limited to 8 letters and must be unique. Color is optional but the name must be present in the internal memory.
delete – Delete a custom mask from the list if they are.
transparency – Set the transparency value of the mask.
color – Set the color of the mask.
none ✔ – Remove the actual mask from the user’s view. ✔ means there is no mask active.
<list of masks>… – List of available masks. The list is built from the textures present in the ‘overlay’ notecard, the one manually added from the menu and optionally auto. auto means the mask is sync to the object style.
Examples of auto masks:
leather beige strap
leather red strap & lashes
leather pink strap & blinders
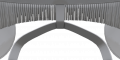
plastic white strap & lashes & blinders


Format is <texture_uuid>,<name>[,<color_name>]. Name length is limited to 8 letters and must be unique. Color is optional and can be: amethyst, azure, black, blood, blue, copper, D.green, F.pink, gold, indigo, L.red, L.yellow, lime, metal, navy, orange, P.pink, plum, purple, red, slate, silver, steel, yellow, white, custom.A or custom.B
Example: 004dd4ed-b5fe-3b36-cf6d-8b97024473c6,2Bholes,black for a black mask with the 2 big holes.

Select the mask you want to remove from the list, you can only delete those which has been added manually.
You can adjust the transparency of the mask.

⇫ BACK ⇫ – Move back to the previous menu.
0% – Make the mask opaque.
100% – Make the mask transparent.
-10% – Reduce the transparency by 10%.
50% – Make the mask half transparent.
+10% – Increase the transparency by 10%.
You can change the base color of the mask to adjust it to your liking, in addition you can also make the color cycling. Best result only one white based mask.
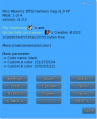
page 1/4
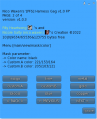
page 2/4
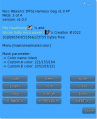
page 3/4
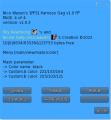
page 4/4


⇫ BACK ⇫ – Move back to the previous menu.
⇦ PREVIOUS - Move back to the previous page.
NEXT ⇨ - Move forward to the next page.
⍰ HELP ⍰ – Streams the help into the chat window.
D.green, F.pink, L.red, L,yellow, P.pink, amethyst, azure, black, blood, blue, copper, custom.A, custom.B, gold, indigo,lime, metal, navy, orange, plum, purple, red, silver, slate, steel, white, yellow – Select the color preset for the mask.
RGB.A, RGB.B – Enter the new value for custom.A or custom.B color. Example <123/123/123>
cycle ✘ – No color cycling.
cycle ✔ – Mask color is cycling to randoms values. Every defined time a new color is randomly selected and the mask change to the next value with gradient.
time – Enter a new cycle time for color change.
The list of available environments presets is variable and build from the maskenv notecard and those that are manually added from the add menu.

page 1/5
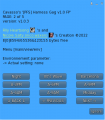
page 2/5

page 3/5

page 4/5
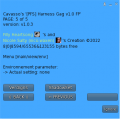
page 5/5


If your settings folder is not populated with environnement settings, the final result may differ depending on the viewer you are using! Best copy all the sets from your Librairy\Environnements\Skies\ to your Inventory\settings\.
⇫ BACK ⇫ – Move back to the previous menu.
⍰ HELP ⍰ – Streams the help into the chat window.
add - Add a custom environnement setting to the set, format is name (8 chars max) no space no punctuation. In case of EEP be sure the setting is present in the user inventory, see folder 'settings'.
delete - Remove a custom environment setting from the list if they are.
none ✔ - No environnement preset active.
default, Neutral, Midnight, Sunrise, A-3AM, A-6AM, A-9AM, Midday, A-3PM, A-6PM, A-9PM, Night,80's Wave, Barcelona, Blizzard, Blue Midday, Bristol, CalWL, Coastal Afternoon, Coastal Sunset, Desert Sunset, Dusty, Fine Day, foggy, Funky Funky Funky, gelatto,Ghost, PaperSnow, Pinkpurple, Pirate, Purple, Purplebluenight, Verdigris, ShadowSet - The user is unable to change the viewer environment settings and is forced to one of the listed. Preset can be EEP settings if the user folders are previously setup.
Examples of environment settings.
default
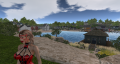
Neutral
Midnight
Sunrise
A-3AM
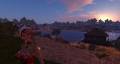
A-6AM
A-9AM

Midday
A-3PM
A-6PM
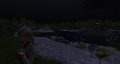
A-9PM
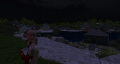
Night
80's Wave
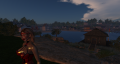
Barcelona
Blizzard
Blue Midday
Bristol
CalWL
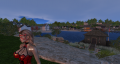
Coastal Afternoon
Coastal Sunset
Desert Sunset
Dusty
Fine Day
foggy

Funky Funky Funky
gelatto
Ghost
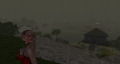
PaperSnow
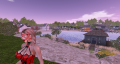
Pinkpurple
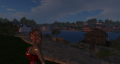
Pirate
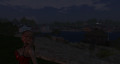
Purple
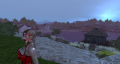
Purplebluenight
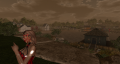
Verdigris
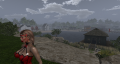
ShadowSet


Example: Bristol for a dark environment setting.
2.7.2.2 Setup environment folder
How to correctly setup your inventory from the environment library.

From this menu you can apply some vision restrictions.

⇫ BACK ⇫ – Move back to the previous menu.
⍰ HELP ⍰ – Streams the help into the chat window.
⏏ EXIT ⏏ – Close the actual menu and release the menu access to anyone.
ML ✔ - Mouselook is enabled and the user's camera is forced to the first-view.
lock ✔ - prevents the user from unlocking the camera from the avatar, meaning that the user cannot use Alt to focus nor orbit the camera around the avatar. While the camera is locked, the sim forces it to stay in a line of sight from the avatar.
limit ✘ - no camera limit range is active, click for options.
limit ✔ - a camera limit range is active, click for options.
focus ✘ - no focus target active, click for options.
focus ✔ - a focus target is active, click for options.
clear ✔ - all restrictions are cleared and reseted to defaults values.
You can enable a limit restriction to the user to not move the camera outside a range.

⇫ BACK ⇫ – Move back to the previous menu.
⍰ HELP ⍰ – Streams the help into the chat window.
limit ✔ - prevents the user from moving the camera outside the defined range from the avatar, either with the mouse wheel or when focusing with the Alt key.
+1m, +2m, +5m, +10m – increase the camera limit range of the selected value, maximum is 96m.
-1m, -2m, -5m, -10m – decrease the camera limit range of the selected value, minimum is 1m.
default – set the camera limit range to the default value of 3m.
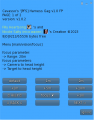
page 1/2
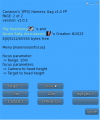
page 2/2


⇫ BACK ⇫ – Move back to the previous menu.
⇦ PREVIOUS - Move back to the previous page.
NEXT ⇨ - Move forward to the next page.
focus ✔ - If the keyholder is present and inside the defined focus range, the user is forced to turn toward the keyholder and the camera will focus one of the selected target, the height of the camera can be forced with myEyes. If the user sit on an object, or the keyholder is off sim, or if the keyholder is outside the focus range, the focus is replaced by camera limit of 3.0m. Be aware that ML is not allowed, if the user decide to roll into ML position an RLV command will be triggered to force to leave ML. In case ML setting is ✔ the user will be toggled from ML to forced camera and vice versa to keep the feeling of the special experience.
+1m, +2m, +5m, +10m - increase the keyholder detection range within the user is forced to focus toward the keyholder, maximum is 96m.
-1m, -2m, -5m, -10m - decrease the keyholder detection range within the user is forced to focus toward the keyholder, minimum is 1m.
default - set the focus range to the default value of 20m.
myEyes ⇧,⇨,⇩ - Select the height of the user's camera, where the user is looking from (head, half height, feet) when focus is active.
target ⇧,⇨,⇩ - Select the height of the user's camera target, where the user is looking at (head, butt height, feet) when focus is active.
show ✔ - If the parcel allows to rez, this function shows inworld the position of the user's camera and where he is looking at. You can use it to adjust the positions of the position where the user is looking from and the position where the user is forced to look at. Disabled if the keyholder vanish or the user sit on an obkect.
Example of the show feature.

In the example here, the user is forced to look at the feet of the keyholder. Name with 🎯 is the looking at and name with 👁 is the looking from.
Texture & color setup is only done over the style menu by both user and keyholder. The Harness Gag can have a leather look or plastic look, for leather you have different sets of textures for the differents colors, for plastic you have only one texture set for the white color and you can colorize it using the color menu. You can also show or hide harness accessories.

⍰ HELP ⍰ – Streams the help into the chat window.
⇫ BACK ⇫ – Move back to the previous menu.
⏏ EXIT ⏏ – Close the actual menu and release the menu access to anyone.
option - Adjust the Harness Gag options.
preset - Select a full preset for the entire harness gag.
select - Adjust individuals prims to the wished looking.
logo - Select the logo to show on the tag.
visible - Show/hide the harness gag accessories.

⍰ HELP ⍰ – Streams the help into the chat window.
⇫ BACK ⇫ – Move back to the previous menu.
G.ring - You can either use a simple ring gag with one prim (easier to adjust) or a complex with three prims (for the picky one!). User can also makes the complex gag's straps symmetric.
G.strap - Toggle the ball gag & holed gag strap from rubber to fabric and vice versa.
no.Mesh ✔ - Enable the open mouth animation for the SL system head.

⇫ BACK ⇫ – Move back to the previous menu.
L.grey, L.beige, L.white, L.blue, L.brown, L.blue, L.pink, L.red, L.yellow - Select one of the leather preset.
Plastic - Select the plastic preset.
NOTE: for leather texture the color is included in the texture and for the plastic texture you only have a white preset, coloring has to be done over the color menu.
If you want to texture or color a part of the harness gag you can do it by selecting the part you want to alter and than select what do you want to change.
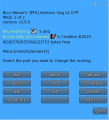
page 1/2
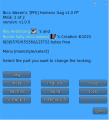
page 2/2


⇫ BACK ⇫ – Move back to the previous menu.
⇦ PREVIOUS - Move back to the previous page.
NEXT ⇨ - Move forward to the next page.
ball, bit, blinder, lashes, cock, cockBase, ear, fab in, fab out, fab trim, holed, lock, metal, ringCoat, strap, tag - Select the part to alter.
When the part you want to alter is selected another menu will ask you what to do.

⇫ BACK ⇫ – Move back to the previous menu.
color - Submenu to change the color.
material - Submenu to change the material.
shine - Submenu to change the shine.
You can change the color, material or shine. Remember the leathers textures include the color and the it is not recommend to recolor them, the final look will not be optimal!.
Select the color you want to apply on the selected part, you can also change the custom A & B color to your liking.
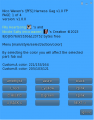
page 1/4
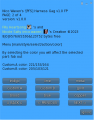
page 2/4
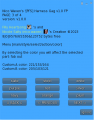
page 3/4
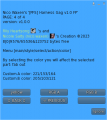
page 4/4


⇫ BACK ⇫ – Move back to the previous menu.
⇦ PREVIOUS - Move back to the previous page.
NEXT ⇨ - Move forward to the next page.
⍰ HELP ⍰ – Streams the help into the chat window.
D.green, F.pink, L.red, L,yellow, P.pink, amethyst, azure, black, blood, blue, copper, custom.A, custom.B, gold, indigo,lime, metal, navy, orange, plum, purple, red, silver, slate, steel, white, yellow – Select the color preset for the mask.
RGB.A, RGB.B – Enter the new value for custom.A or custom.B color. Example <123/123/123>

⇫ BACK ⇫ – Move back to the previous menu.
L.grey, L.beige, L.white, L.blue, L.brown, L.blue, L.pink, L.red, L.yellow - Select one of the leather material.
Plastic - Select the plastic material.
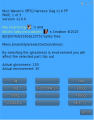
page 1/2

page 2/2


⇫ BACK ⇫ – Move back to the previous menu.
⇦ PREVIOUS - Move back to the previous page.
NEXT ⇨ - Move forward to the next page.
⍰ HELP ⍰ – Streams the help into the chat window.
-1g – Reduce the glossiness by 1.
-10g – Reduce the glossiness by 10.
-100g – Reduce the glossiness by 100.
+1g – Increase the glossiness by 1.
+10g – Increase the glossiness by 10.
+100g – Increase the glossiness by 100.
-1e – Reduce the environment by 1.
-10e – Reduce the environment by 10.
-100e – Reduce the environment by 100.
+1e – Increase the environment by 1.
+10e – Increase the environment by 10.
+100e – Increase the environment by 100.
The materials textures already include the glossiness and environment values, but you can change the to your liking.
You can select the harness gag accessories to be shown or hiden.

⇫ BACK ⇫ – Move back to the previous menu.
tag - Show/hide the tag.
lashes - Show/hide the lashes.
ear - Show/hide the ears.
blind - Show/hide the blinders.
You can select up to 4 accessories to be shown or not.
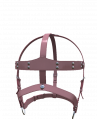
none
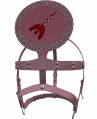
tag
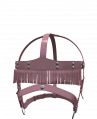
lashes
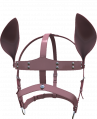
ears
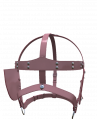
blinders
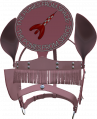
all


You can select the logo to be shown on the tag if that last one is visible. The list of logos textures is build from the logo notecard and the one that are manually added using the add menu. You can also download the UV file to make your own logo.
page 1/3
page 2/3
page 3/3
⇫ BACK ⇫ – Move back to the previous menu.
⇦ PREVIOUS - Move back to the previous page.
NEXT ⇨ - Move forward to the next page.
⍰ HELP ⍰ – Streams the help into the chat window.
add - Add a custom logo to the list. Format is <UUID of the texture>,<unique name>.
delete - Delete a custom logo from the list if they are.
get UV - Get the UV map to make your own logo.
none - Hide the actual logo.
CMFS, PFS, bee, bunny, cow, k.lock, mare, p.girl, pig, ponizei, puppy, slave, slut - Select the logo to be shown on the tag if visible.
Example of the tag's logos

PFS
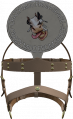
CMFS
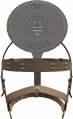
Bee
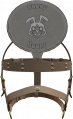
Bunny

Cow

Keep locked

Mare

Neko

Owned
Ponyboy

Ponygirl
Pig
Puppy

Slave
Slut
3. Resize it
The harness gag is not rigged and you have to adjust it to your head by yourself, If you are not used to it you can find many manu tutorials on Youtube but here you will find an example of to resize the gag.
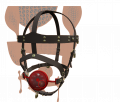
Step 1: Right click the harness gag and get the Edit option.
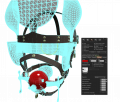
Step 2: The Edit menu should open to gives you several tools to edit it.
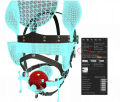
Step 3: Select the checkbox Edit linked.

Step 4: Play with the arrows until the gag ball is selected.
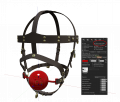
Step 4: Play with the arrows until the gag ball is selected.
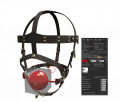
Step 5: A gag ball is supposed to be symetric and placed in the middle of the mouth. For that purpose make sure the checkbox Stretch Both Sides is checked. For some straps you may need to uncheck this to have a better fitting.
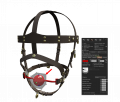
Step 6: Now press and keep pressed the CTRL and SHIFT keys while grabbing the corner and move it. You can move also the ball w/o those keys pressed and grab directly the colored arrows.
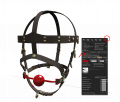
Step 7: If happy you can either close the edit window or scroll to the next prim to adjust.


4. Options
4.1 Access plugins
You can add access script (public or for PFS staff), for this you have to rez the box '[PFS] Harness gag addons v1 (REZ me)' on the floor and unpack it into your inventory. Than rez the Harness gag on the floor too and drag & drop from your inventory into the content tab of the harness gag the access script you want to add. You can add both to have public and PFS access.

4.2 Smart leash holder
You can use any leash holder to leash the harness gag as long the name contains one of the word: holder, handle or leash. You can also use the integrated smart leash holder (you can get it from the leash menu) and have additionnal feature like follow TP and easy force TP from anywhere.
![[PFS] smart leash holder](/wiki/File:HG_leash_holder.png)
The smart leash holder automatically register and unregister the leash you grab, release or get released by timeout. For more details and options you can touch it to get a menu.

exit – Close the menu.
auto TP [✔] - Auto TP is enable and leash anyone listed above if the distance is greatter than 2 times the leash length.
auto TP [✘] - Auto TP is disabled but you can still force TP using the shortcuts (see get tools).
verbose [✔] - The smart leash holder becomes very chatty, mainyl for debug purpose.
verbose [✘] - The smart leash holder spams you as less than possible.
send TP - Send a force TP to anyone listed above.
get tools - Offers you a set of gestures to have keyboard shortcuts for menu & force TP.
![[PFS] smart leash tools](/wiki/File:HG_leash_gestures.png)
The smart leash holder is the best tool to keep your favorite pet close to you in any conditions!.

4.3 Truekey
If you get in big troubles, you have no access plugins, the only way to get free without cheating out is to use a Truekey you previously have setted up before to get locked. Truekey works with a password and it can't be changed or read when the harness gag is locked. The Truekey password is also resetted to a random value at any full reset. You cannot use the Truekey on yourself but you can ask anyone to use it as long the person knows the password!
![[PFS] Truekey](/wiki/File:HG_truekey2.png)
To get the Truekey menu the user have to ckic it longer than 2s! You can also get it by command line /7nitruekey if your username starts with ni.
4.3.1 Setup a new Truekey
The user has to setup the Truekey before to use it, functions available from the harness gag tools menu while unlocked and key back.

The user can here see the actual Truekey password and change it with set pw. User can also get a new Truekey with Truekay and than can give it away. Keep in mind the Truekey is reseted on transfert and you have to give both the Truekey and password to the person to be able to use it the day you need it. There is no way to get the actual password or change it when the harness gag is locked!
4.3.2 Add password to Truekey
A Truekey can keep in memory more than one password, the limit is the free memory available to store more. The next user of the Truekey have to adds the harness gag users's password to be able to use it.

Click add pw to add a new password to the list. Here in our example the password 564641 has been saved. You can also remove password with remp pw or reset the Truekey to its initial state with reset.
4.3.3 Use a Truekey
To use a Truekey to unlock the harness gag you have first to access the harness gag user's tools menu.

As you can see in the example above here you cannot see the Truekey password but you can use key. Click first use key and than simple touch your Truekkey you are are already wearing and has been already configured (see above if not).
If you success you should get in the chat window [TrueKey] key grabbed and the harness gag user's main menu should pop!
5. Fix your cheeks
With some shapes you may have a collision between the harness gag and your cheeks. Since the harness gag isn't rigged you have to adjust your shape.

To edit your shape move your mouse over your tag, right click your mouse button.

Select appearance and click it with the left mouse button.

From the tab head you can shift the Upper Cheeks cursor to adjust it under the strap.

When you are done don't forget to click save to save it to the actual shape or a new one with new name. During the editing, if you are not happy of the result, you can click Undo Changes and you will get back all your actual shape settings.
6. Update your adjusted one
Auto update with a script would turn the harness gag into a no copy object and we don't want that. To help you to update your actual harness gag that you spent lots of time to adjust I will show you how to keep it as it is and update it.
Rez side by side both harness gags on the floor.
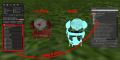
1. Copy everything from the new content into the temp folder
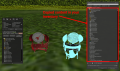
2. All the content should be present in your temp folder
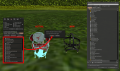
3. Delete everything in the actual harness gag content (yes do it!!!)
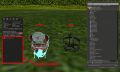
4. Your actuel harness gag's content should be empty
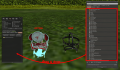
5. copy everything from the temp folder into the actual harness gag's content
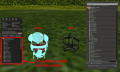
6. All the temp folder should be present in your actual harness gag's content
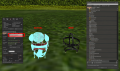
7. Update the object name with the new version number
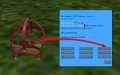
8. launch a Reset Link Set Data (RLSD) from the menu main/tools
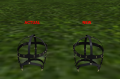
9. You are done, grab your actual one, delete the new one and the temp folder


