Difference between revisions of "PFS bridle"
m |
m |
||
| Line 10: | Line 10: | ||
- colorize & texture over menu, accessible by both user and keyholder</br> | - colorize & texture over menu, accessible by both user and keyholder</br> | ||
- add additionnal scripts for public, PFS access</br> | - add additionnal scripts for public, PFS access</br> | ||
| − | - add your own access script (example is provided)</br | + | - add your own access script (example is provided)</br> |
- set a public leash access</br> | - set a public leash access</br> | ||
- manage baned list & allowed list</br> | - manage baned list & allowed list</br> | ||
Revision as of 06:26, 23 May 2025
Contents

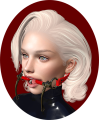
[PFS] Bridle v1
The [PFS] Bridle is a bondage gear (not rigged and compatible to any head) to restrict your talk mostly dedicated to ponyplay, it can be used in many other disciplines, you will be able to:
- lock/unlock with RLV or RLVa
- restrict your ability to talk with 5 gag levels plus full silenced
- apply several restrictions in addition of the gaggish
- leash with auto turn and auto TP to leash holder
- use RL/SL timer
- colorize & texture over menu, accessible by both user and keyholder
- add additionnal scripts for public, PFS access
- add your own access script (example is provided)
- set a public leash access
- manage baned list & allowed list
- manage primary owner and secondary owners
1. Generalities
This bondage gear is the result of the cooperation with Filly Heartsong who did the mesh design. We both put together our long experience in mesh design and scripting to provide you an unique gear. Because we care we are open to listen all your comments and suggestions, as long it will help to get a better product!
1.1 RLV
As a viewer standard, RLV restrictions are filtered to the object UUID and if your object uses same restrictions for several functions, you may run into trouble and the result may look a way different than expected. Thay's why RLV, here, is managed to the script level. You can have several scripts triggering restrictions w/o any interactions between them. You can easily follows the object restrictions table from the RLV menu.
1.2 Access
The menu access is build in an inovative way. As standard, everyone can access the menu, with different access levels. Access levels are:
- public
- keyholder
- selftouch
Depending on the lock state of the object, you may get different access levels (they are cumulable) which allows you to do things or not. The not allowed functions are strikethrough but the positive side is you can still read every parameter and setting, including the user.
The menu is mono user but the keyholder has always the priority to access it.
You can access it using the command line over channel 7, just hit /7##tail to get access to the main menu of the object. Replace ## with the user 2 first letters of the user name.
The use of the API allows you to override the actual keyholder, this will help you to implement your own access list from wherever you want. You can implement "key grabbing" scripts as much you want they are asked one after the other. For more info look at the included public access script "plug.access.public".
1.3 Configurable
The object includes a config notecard to configure it, you can modify it at your own risk to change the color palette, animation.
1.4 API
Objects you cannot mod are no fun, that's why you will find here an integrated API that will allows you make your own key grabbing script. plug.access.public is a script, full mod and documented, to make your own.
1.5 Integrated help
To make it accessible and easy to use, the object menus have a "help" feature to stream in your chat window some general informations regarding the actual menu displayed to help you to understand what does every buttons.
1.6 Truekey
The only way to unlock the object is the use of the key held by the keyholder. In case you are stuck or the keyholder not showing back you can, if set up previously, use the Truekey feature to get unlocked by everyone having the key password. You can access it, set it up and use it fromt he "Tools" menu.
2. Bridle features
The main menu provides you an access to all the functions. You can access it if you touch me or use the command line in the of 5m range. Command line is on channel 7 and is built with the 2 first letters of the username followed by the type of the gear: gag here... Example for 'nikki resident' gag you will type /7nigag (you will be noticed if the user has a customized prefix). You can also replace the prefix with '*' to get all users menus. Keyholder are not concerned by the distance limit but take in account the talk range limit.

❓ HELP ❓ – Streams the help into the chat window.
⏏ EXIT ⏏ – Close the actual menu and release the menu access to anyone. If not, the access menu will timeout after 300s of no use. Keyholder always have the priority to access the menu even if used by someone else. The actual menu user will be noticed for any attempt to access the menu (fail or success).
lock 🔓 – This object is not locked, no RLV restrictions are applied.
unlock 🔒 – This object is locked, you cannot remove it and RLV restrictions are applied.
key 🚫 – The key is not present and has been taken by someone.
key 🔑 – The key is present, you can maybe grab it.
access – Sub-menu for the access settings.
RLV – Sub-menu for RLV restrictions if they are.
timer ❌/✅ – Sub-menu for timelock (❌=no timer in use, ✅=timer in use).
tools – Sub-menu for the Truekey and some settings.
gag ❌/✅ - Sub-menu to gag feature (❌=no function in use, ✅=at least one function in use).
leash ❌/✅ - Sub-menu to leash feature (❌=no leash in use, ✅=leash in use).
style - Sub-menu for the style of the head harness.
When unlocking you get some options, you can either call the default settings back to put the rubber ponytail to its initial state, or keep the settings as they are so the rubber ponytail will take the last used settings at the next lock

YES – All the settings except style are reset to their default values.
NO – All the settings are left as they are, at the next lock all restrictions will be applied again.
MENU – Get the main menu back.
NOTE: timeout for this menu is shorter than the standard 300s, only 10s!.

❓ HELP ❓ – Streams the help into the chat window.
❌ BACK ❌ – Move back to the previous menu.
⏏ EXIT ⏏ – Close the actual menu and release the menu access to anyone.
private ✅ – Only user and owner can access it.
public ✅ – Anyone can access the menu and grab the key.
ask ✅ – Same as public but if someone want to grab the key, the actual keyholder (if present in the region) will be asked to allow it or not.
group ✅ – only same group then user can access it.
PFS ✅ – PFS staff can grab the key.
owner – Sub-menu to add/delete owners.
NOTE: if private, public, ask and group are ❌, anyone can access the menu, you can grab the key if available but if the key is already taken you can still go into all menus but all the buttons will be strikethrough.
Exemple of strikethrough menu where the menu user has the free access level

You can add by scan or UUID one primary owner and two scondary owners. Only primary owner can add secondary owners.

❓ HELP ❓ – Streams the help into the chat window.
❌ BACK ❌ – Move back to the previous menu.
⏏ EXIT ⏏ – Close the actual menu and release the menu access to anyone.
prim+ – Add primary owner (only user can do it).
sec+ – Add secondary owner, only primary can add secondary owners (2 max).
remove – Primary owner can remove secondary owners or itself if unlocked.
You can add by scan or UUID banned persons to access your gear. This menu is always available to the user when locked or not.

❓ HELP ❓ – Streams the help into the chat window.
❌ BACK ❌ – Move back to the previous menu.
⏏ EXIT ⏏ – Close the actual menu and release the menu access to anyone.
ban+ – Add someone by entering the UUID or by scan to the banned list.
ban- – Remove someone from the banned list.
list – Stream the banned list to your chat window.
You can add by scan or UUID allowed persons to access your gear, this is useful if the access level is set to private and you want to allow only few persons the access. This menu is always available to the user when locked or not.

❓ HELP ❓ – Streams the help into the chat window.
❌ BACK ❌ – Move back to the previous menu.
⏏ EXIT ⏏ – Close the actual menu and release the menu access to anyone.
allow+ – Add someone by entering the UUID or by scan to the allowed list.
allow- – Remove someone from the allowed list.
list – Stream the allowed list to your chat window.

❓ HELP ❓ – Streams the help into the chat window.
❌ BACK ❌ – Move back to the previous menu.
⏏ EXIT ⏏ – Close the actual menu and release the menu access to anyone.
Truekey – Only the wearer can get a new Truekey. The key can get given away, but the final user will need to know the password.
set pw – Set a new password number for the Truekey.
use key – When you wear the Truekey with the correct password you can grab this object key. The wearer cannot use the Truekey on its own object!
spam – Access the sub-menu to change the spam setting.
prefix – change your prefix to whatever you want as long it's built with 2 letters.
RLSD – Reset the linkset data and restart all scripts, default material preset will be applied.
You can adjust the level of spam from differents types of message: RLV version, main feature and sub feature. You can either set it to public, private, both or disabled. By definition a sub feature is usually a parameter of a main feature, example: wrists bind into the armbinder is a main feature but fartouch restriction is a sub feature.

❓ HELP ❓ – Streams the help into the chat window.
❌ BACK ❌ – Move back to the previous menu.
⏏ EXIT ⏏ – Close the actual menu and release the menu access to anyone.
RLV ✅ - spam the RLV version on the public chat at login/wear/reset, private - only user can read it, ❌ - disabled.
main ✅ - spam user and menu user for all main feature, public - only menu user, private - only the user, ❌ - disabled. (note: sub feature spam is following the same setting until the sub setting is changed)
sub ✅ - spam user and menu user for all sub feature, public - only menu user, private - only the user, ❌ - disabled.
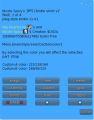
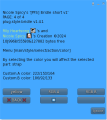
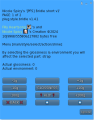
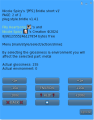
Universal scripts must deal with different configurations where sometimes same restrictions can be triggered by two scripts. That’s why here RLV restrictions are managed in a unique way. The goal is to keep things working as they should and especially when restrictions are lifted. All active restrictions are listed with the restriction itself like touchfar=n and the script which triggered it from sub.wrist.

❓ HELP ❓ – Streams the help into the chat window.
❌ BACK ❌ – Move back to the previous menu.
⏏ EXIT ⏏ – Close the actual menu and release the menu access to anyone.
list - Stream in your chat window all the active restrictions with the script name which is the source of the restriction. You may see same restriction for different scripts, this is all normal.
Example of streamed out list of active restrictions:

NOTE: When the timer runs out, the key is given back to the user. No one will be able to grab it except if some extern access modes are set.
The timer can be RL or SL time, you can switch from one to another w/o resetting the time left. Wearer can set a timer and do some self-bondage, once started the timer cannot be stopped except if someone else grab the key and get the keyholder access level.


❌ BACK ❌ – Move back to the previous menu.
⏪ - Move back to the previous page.
⏩ - Move forward to the next page.
❓ HELP ❓ – Streams the help into the chat window.
stop - Stop the actual timer but don't give back the key back to the user.
RLtime ❌ – SL time mode.
RLtime ✅ – RL time mode.
hide ✅ – The actual timer value and any added time triggered by the menu buttons are hided to the wearer.
+2min – Add 2 minutes to the actual timer value.
+5min – Add 5 minutes to the actual timer value.
+30min – Add 30 minutes to the actual timer value.
+1h – Add 1 hour to the actual timer value.
+3h – Add 3 hours to the actual timer value.
+6h – Add 6 hours to the actual timer value.
+12h – Add 12 hours to the actual timer value.
+24h – Add 24 hours to the actual timer value.
NOTE: The restrictions are only active when the object is locked, and a gag type is applied.


❌ BACK ❌ – Move back to the previous menu.
⏪ - Move back to the previous page.
⏩ - Move forward to the next page.
❓ HELP ❓ – Streams the help into the chat window.
level ▂▃▅▇▉ – Gag level, from lightly gagged (▂) to heavy (▉).
no gag ✅ – No gag level at all.
Safe ✅ – When safe the gag's channel changes every now and then to avoid cheat with gag's readers.
Rename – Set an alternative name for the gag talk and emotes.
emote ❌ ▂ ▆ ▉ – Capps the emotes length to the following levels:
- none [❌] – disabled.
- light [▂] – 40 chars/10 sec
- heavy [▆] – 20 chars/20 sec
- total [▉] – swallows all emote.
OCC ✅ – OCC (()) is allowed.
OCC ❌ – OCC (()) is restricted.
srt.IM ✅ – Start IM is allowed.
srt.IM ❌ – Start IM is restricted.
snd.IM ✅ – Send IM is allowed.
snd.IM ❌ – Send IM is restricted.
rec.IM ✅ – Receive IM is allowed.
rec.IM ❌ – Receive IM is restricted.
key.IM ❌ – no IM exception to keyholder.
key.IM ✅ – IM exception to keyholder.
clear ✅ – Reset all gag settings back to default values. ✅ means the settings are on default values.
Since the object is not rigged you can easily adjust the gags to your head by editing the object.
If you use the smart leash holder available from the [tools] button from leash menu, you can make the user following you when leashed even through TP. As soon as the distance between the leash holder and the wearer is greater than 2 times the leash distance a TP is send to the user. If the leash holder is not detected in the same region, a leash timeout is triggered after 300s and the user will be unleashed.

❓ HELP ❓ – Streams the help into the chat window.
❌ BACK ❌ – Move back to the previous menu.
⏏ EXIT ⏏ – Close the actual menu and release the menu access to anyone.
tools – Get the smart leash holder.
leash ✅ – Grab the leash in your hand (✅=leash to person active).
post ✅ – Leash to an object (✅=leash to post active).
length Ym – Sub-menu to select the leash length (Y=actual leash length).
unleash – Disconnect the leash from your hand or post.
yank – Yank the leash to make the user moving up to the leash target the distance is less than 1m.
type [Z] – Select leash type chain (c) or rope (r).
public ✅/❌ – When enabled, anyone can use the leash even if the public access is disabled. You can't rip the leash from someone already holding it!
NOTE: User can be leashed from either the bridle itself or the faux one hanging around the neck. If the the faux bridle isn't worn the leash will stay on the bridle side even if not gagged and transparent!


Texture & color setup is only done over the style menu by both user and keyholder. The tailuses 3 bases PBR materials textures (Black, Red & white) that can be used on different parts. You can adjust the style color from a color palette or custom colors and also the shine level. The legacy is textured too to make it compatible with old viewers not supporting PBR material. You can adjust the style of a specific part if you select the one you want to mod.

❓ HELP ❓ – Streams the help into the chat window.
❌ BACK ❌ – Move back to the previous menu.
⏏ EXIT ⏏ – Close the actual menu and release the menu access to anyone.
option - Adjust the bridle options.
preset - Select a full preset for the entire bridle.
select - Adjust individuals parts to the wished looking.

❌ BACK ❌ – Move back to the previous menu.
❓ HELP ❓ – Streams the help into the chat window.
noMesh ✅ – If you don't use mesh head and to get the open mouth animation when gagged.

❌ BACK ❌ – Move back to the previous menu.
❓ HELP ❓ – Streams the help into the chat window.
Black, White, Red, B.red - Select one of the preset.
NOTE: You can still adjust the colors when the preset is used by using the select and color menus.
Examples of different presets.

Black

White
Red
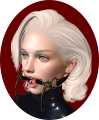
B.red


If you want to texture or color a part of the ponysuit, you can do it by selecting the part you want to alter and than select what do you want to change.

❌ BACK ❌ – Move back to the previous menu.
⏪ - Move back to the previous page.
⏩ - Move forward to the next page.
❓ HELP ❓ – Streams the help into the chat window.
strap, S.trim, bit, metal, padlock - Select the part to modify.
When the part you want to modify is selected another menu will ask you what to do.

❌ BACK ❌ – Move back to the previous menu.
❓ HELP ❓ – Streams the help into the chat window.
color - Sub-menu to change the color.
material - Sub-menu to change the material texture.
shine - Sub-menu to change the shine.
Select the color you want to apply on the selected part, you can also change the custom A & B color to your liking.

page 1/4
page 2/4

page 3/4
page 4/4


❌ BACK ❌ – Move back to the previous menu.
⏪ - Move back to the previous page.
⏩ - Move forward to the next page.
❓ HELP ❓ – Streams the help into the chat window.
D.green, F.pink, L.red, L,yellow, P.pink, amethyst, azure, black, blood, blue, copper, custom.A, custom.B, gold, indigo,lime, metal, navy, orange, plum, purple, red, silver, slate, steel, white, yellow – Select the color preset for the selected part.
RGB.A, RGB.B – Enter the new value for custom.A or custom.B color. Example <123/123/123>
Palette of colors:

Select the material you want to apply on the selected part.

❌ BACK ❌ – Move back to the previous menu.
❓ HELP ❓ – Streams the help into the chat window.
Black, White, Red - Select one of the material.
Increase or decrease the shine & environment for the selected part.
page 1/2
page 2/2


❌ BACK ❌ – Move back to the previous menu.
⏪ - Move back to the previous page.
⏩ - Move forward to the next page.
❓ HELP ❓ – Streams the help into the chat window.
-1g – Reduce the glossiness by 1.
-10g – Reduce the glossiness by 10.
-100g – Reduce the glossiness by 100.
+1g – Increase the glossiness by 1.
+10g – Increase the glossiness by 10.
+100g – Increase the glossiness by 100.
-1e – Reduce the environment by 1.
-10e – Reduce the environment by 10.
-100e – Reduce the environment by 100.
+1e – Increase the environment by 1.
+10e – Increase the environment by 10.
+100e – Increase the environment by 100.